Olympic National Park is the largest national park in Washington and is home to many of the state’s best hikes.
Olympic National Park has four distinct ecosystems and is divided into different areas with separate entrances. This means that there are many different kinds of hikes to enjoy.
I’m a national park expert and I have hiked all over Olympic National Park. In this guide to the best hikes: Olympic Peninsula, you’ll find descriptions of all of the best hiking in Olympic National Park.
TOP TOUR: Book a full-day private hiking tour now
TOP HOTEL PICK IN PORT ANGELES: Check availability now
TOP HOTEL PICK IN FORKS: Check availability now
FIND THE CHEAPEST CAR RENTAL: Search Discover Cars for the best deals
FIND THE CHEAPEST FLIGHTS: Search Skyscanner for the best deals
GET TRAVEL INSURANCE: Get insured with Travelex before you go
TAKE AN AUDIO TOUR: Buy an audio tour now
No time right now to learn about the best hikes in Olympic National Park? Pin It and save it for later:


Please note this post may contain affiliate links, which means we may receive a commission, at zero cost to you, if you make a purchase through a link. Please see our full Disclosure for more information. If you have any questions, please contact me.
Subscribe to regular updates with tips for planning, travel inspiration and trip ideas and get instant access to the free PDF of this guide to
The Best Hikes in Olympic National Park
Table of Contents
Guided Hikes – Olympic National Park
It’s certainly possible to do all of these hikes by yourself but a guide can give you even more information about the best places to hike in Olympic National Park and describe what you’re seeing along the way. Plus, if time is limited and you prefer not to drive, a day tour from Seattle or Port Angeles is a convenient way to get to the national park.
Some tours to Olympic National Park that include hikes (or the option to hike) are:
Hurricane Ridge Tour
This private tour spends about three hours at Hurricane Ridge, which is enough time for one or two of the hikes there. You’ll have a knowledgeable guide and it includes pick up and drop off at your hotel.
BOOK A PRIVATE ALL-DAY TRIP FROM SEATTLE TO HURRICANE RIDGE
Lake Crescent Tour
This all-inclusive day tour stops at the Elwha River Valley and the Salt Creek Recreation Area for tide pooling (tides permitting), but most of the time is spent at Lake Crescent and a hike to Marymere Falls. It includes pickup/ drop off from downtown Seattle hotels, breakfast, gourmet lunch and the entrance fee to Olympic National Park.
BOOK THIS DAY-TRIP TO LAKE CRESCENT HERE
Sol Duc Valley Tour
This is a full day of hiking in Olympic National Park with your own private guide to explain in detail what you’re seeing along the way. It will take you on hikes at Hurricane Ridge (read Best Hikes in Hurricane Ridge to see options) and Lake Crescent (read Best Hikes in Lake Crescent) AND a hike to Sol Duc Falls. This is a private tour, so you get the guide all to yourself – and can choose the hikes you like (as long as you can fit them in the schedule, of course).
BOOK THIS PRIVATE ALL-DAY GUIDED HIKING TRIP TO 3 AREAS IN OLYMPIC NATIONAL PARK
Hoh Rainforest Tour
A private tour means you get the guide all to yourself – and have more flexibility in what you do. An expert naturalist guide can point out all the features of what you’re seeing and give you extra information that will enhance your hikes. You get picked up at Kalaloch Beach 4 and spend some time at Ruby Beach as well as the Hoh Rainforest. Choose this hike in the Hoh and you won’t be disappointed!
BOOK THIS PRIVATE TOUR TO HOH RAINFOREST AND KALALOCH BEACHES
Pacific Beaches Tour
This private full day tour actually meets at the parking lot for Beach 4. In addition to time at the beach, possible stops include Rialto Beach, Tree of Life and the Hoh Rainforest.
BOOK A FULL-DAY PRIVATE TRIP TO OLYMPIC NATIONAL PARK
Best Hikes in Olympic National Park
There are so many top picks for best hikes at Olympic National Park that I’ve divided them into the different regions of the park. So here you’ll find the best Olympic Mountain hikes, the best waterfall hikes, the best beach hikes, the best rainforest hikes, and more.
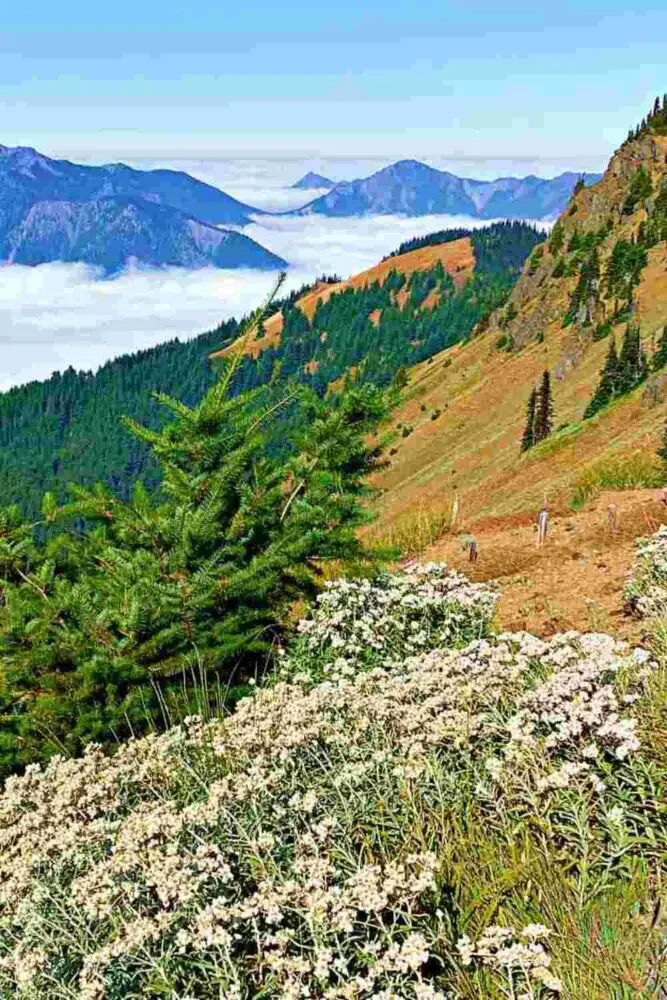
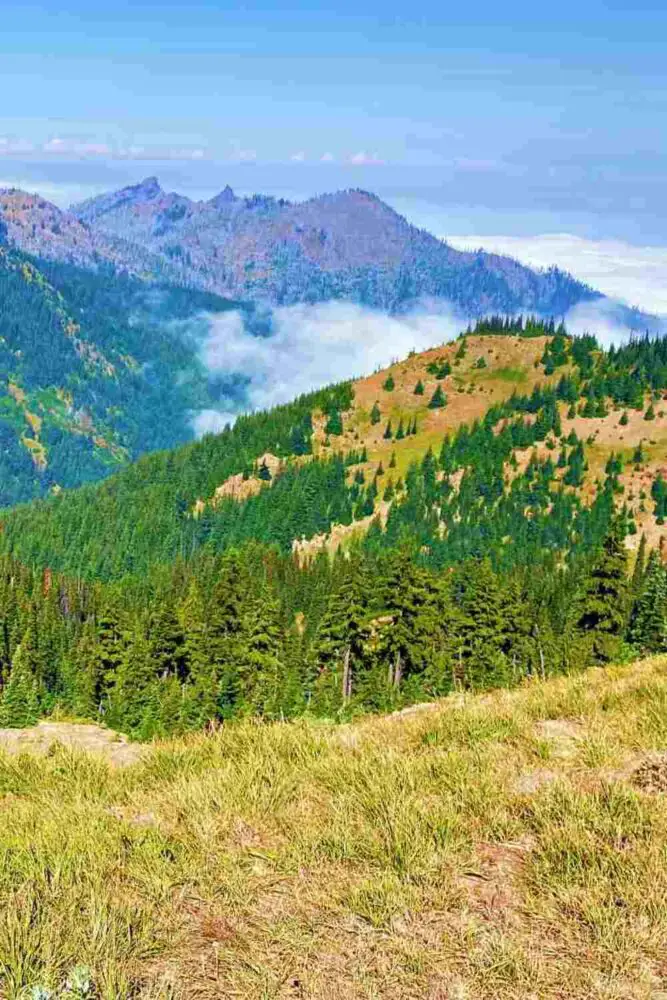
Hurricane Ridge Hikes
Hurricane Ridge lies in the northeastern section of Olympic National Park and is the main accessible mountainous area of the park. Consequently, the area has some of the best mountain hikes in Olympic National Park.
From all of these top hikes in Olympic National Park, you will get incredible views over the Olympic mountains. On clear days, you can see all the way to Canada!
Hurricane Ridge is located 17 miles up a scenic but narrow, steep and winding road from Port Angeles. The drive takes 45 – 60 minutes. The Hurricane Ridge Road is open 24 hours a day from mid-May to October and (weather permitting) on weekends the rest of the year.
READ MORE:
1. Hurricane Hill Trail
Length: 3.2 miles round trip (out-and-back) | 2 hours
Difficulty: Moderate
Trailhead: Hurricane Hill Trailhead at the far end of Hurricane Ridge Road
This trail is one of the best hikes in the Olympic National Park if you’re looking for expansive mountain views. On a clear day, you can see all the way to Canada.
The trail starts at the parking lot and the first 0.4 miles is fairly flat and is wheelchair accessible. The path then starts to climb up a series of broad switchbacks, passing through expansive meadows that burst into bloom in summer. Stop and enjoy incredible mountain views along the way.
There are also several interpretative panels at viewpoints, with information about different aspects of this area of the national park.
The trail is fully paved, except for a very short distance right at the end to the very summit of Hurricane Hill. It’s rated as moderate and is fairly short, but is nonetheless one of the hardest hikes in Olympic National Park mostly due to the 650 feet elevation change. However, there are benches spaced along the way so you can rest.
Insider Tips:
- To reach the trailhead, drive 1.5 beyond the old Hurricane Hill Visitor Center. This is a narrow road that’s not suitable for RVS and trailers.
- If the parking lot near the trailhead is full, there is overflow parking at Picnic Areas A and B. There is a trail through the woods from Picnic Area B to the trailhead.
Highlights:
- Panoramic views of the Olympic Mountains. On a clear day, you can see all the way to Canada.
- Wildflowers in summer
- Chances of seeing marmots, deer and black bears
READ MORE: Hurricane Hill Trail Guide
2. High Ridge Trail to Sunrise Point

Length: 0.9 miles | 30 minutes
Difficulty: Easy (though it is steep in parts)
Trailhead: Opposite the old Hurricane Ridge Visitor Center (near start of parking lot)
This is one of the great hikes in Olympic National Park. From the trailhead, you’ll be on the Big Meadow Loop for a short distance.
At a fork, go right and for an even shorter distance, you’ll technically be on the Cirque Rim Trail. At the next fork, to hike in a counterclockwise direction, go right. This is the High Ridge Trail.
The trail climbs steadily, with wonderful views backwards towards the parking lot or to the right where you can see panoramic mountain views and the Hurricane Ridge Road snaking its way up from Port Angeles far below.
You’ll come to a four-way intersection. To the right is the trail to Klahane Ridge. You could take this for a mile or so and then turn back for a longer hike.
Straight ahead is a side out-and-back trail along a narrow ridge to Sunrise Point. This is worth it for great views, but be aware that there are steep drop offs on both sides, so this can be challenging if you have a fear of heights.
Back at the four-way intersection, if you turn a sharp left (or go right if returning from Sunrise Point), you start returning via a loop. This section has a short switchback section and goes through some woods.
After the switchbacks, you’ll come to another intersection. Go left to complete the loop back to the trailhead or turn right to hike the Cirque Rim Trail (see below; recommended).
Keep an eye out for deer, bears, and marmots, as they are frequently seen in this area.
Insider Tips:
- I recommend hiking to Sunrise Point on the High Ridge Trail in a counter-clockwise for the best views.
- This hike is best done on a clear day, as the views are the major reason to be there.
- Be sure to have good hiking shoes or boots (and microspikes if there is snow, which there often is well into June) and have hiking poles.
Highlights: One of the top hikes Olympic National Park for mountain views
READ MORE: High Ridge to Sunrise Point Trail Guide
3. Cirque Rim Trail
Length: 1-mile round trip
Difficulty: Easy
Trailhead: At start of parking lot near the old Hurricane Ridge Visitor Center (if you hike counterclockwise) OR at far end of Hurricane Ridge parking lot (if you hike clockwise)
The Cirque Rim is not only one of my Olympic National Park top hikes, it’s also one of the best easy hikes in Olympic National Park.
Most of the trail runs along the rim of a large bowl shape. It passes meadows that burst into wildflower blooms in summer on one side. On the other are stunning mountain views. A highlight is the Cirque Rim Viewpoint, where you can see Port Angeles and the Strait of Juan de Fuca on clear days.
This is a short, easy, paved trail that is perfect for kids and even possible in a wheelchair with some assistance.
Insider Tips:
It’s best to hike the trail clockwise if you’re connecting to the Big Meadow trail that runs parallel below the rim because it makes the connections easier. Hike the trail counterclockwise (if you’re connecting it to the High Ridge and Sunrise Point trails (which I recommend).
Highlights:
- Meadows of wildflowers in summer
- Panoramic views of the mountains and oceans beyond
- Possibility of seeing marmots, bears, and deer
READ MORE: Cirque Rim Trail Guide
Crescent Lake Hikes
There are several really great hikes near Lake Crescent. These include one of my favorite waterfall hikes Olympic National Park has and a couple of super fun lake hikes. Olympic National Park has incredible old growth forests and interesting history, which you can also experience on these hikes.
READ MORE: Best Hikes Near Lake Crescent
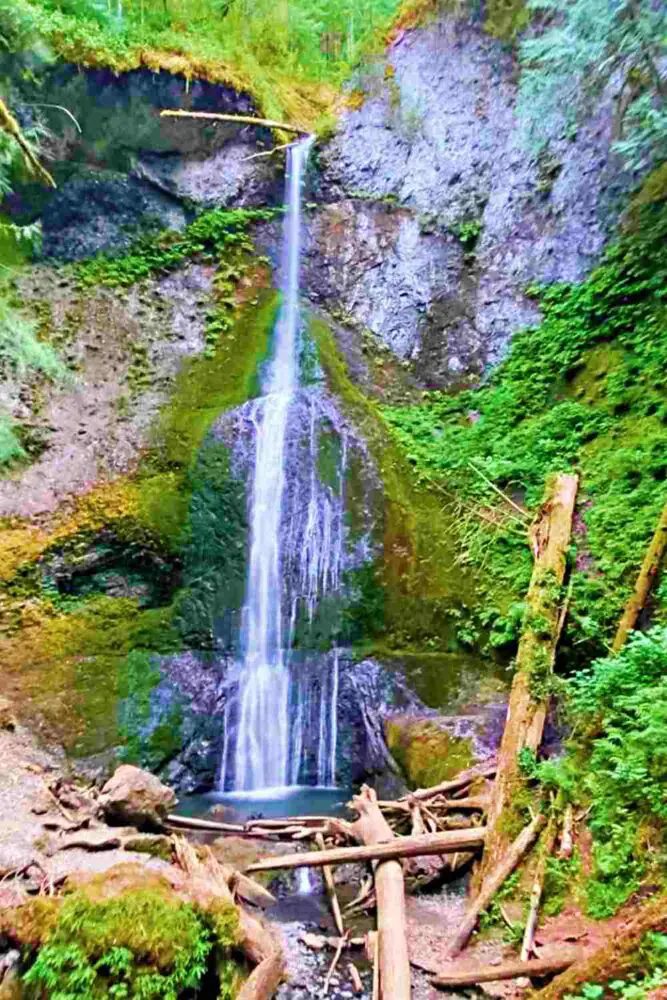
4. Marymere Falls Trail
Length: 1.8 miles out-and-back
Difficulty: Easy
Elevation Gain: 400 feet
Marymere Falls Trailhead: There are two trailheads – at the Storm King Ranger Station and at Lake Crescent Lodge.
The Marymere Falls hike is one of the most popular short hikes in Olympic National Park, and it’s easy to see why.
The trail winds its way through magical old growth forest to the tallest waterfall in Olympic National Park.
Wherever you start the trail, you will pass under Highway 101 and end up on the same trail. You’ll pass enormous ferns, towering spruce, fir and cedar trees, and Dr-Seuss-like Bigleaf Maple trees covered in moss.
After crossing two wooden bridges, the trail climbs in a loop to the 90-foot waterfall. Two viewpoints provide slightly different views of the narrow horsetail waterfall, and the small pool below.
Insider Tips:
- If you start at the Storm King Ranger Station, hike to Marymere Falls first, then do the Moments in Time trail on your return. You’ll end up Lake Crescent Lodge, before looping back to the ranger station.
- If you start at Lake Crescent Lodge, the first sign that you come to that says “Storm King Ranger Station” is the connecting trail for the Moments in Time trail, even though it is not mentioned on the sign. If you want to go the ranger station, there is a more direct path further along.
Highlights:
- Waterfall
- Old growth forest
READ MORE: Marymere Falls Trail Guide
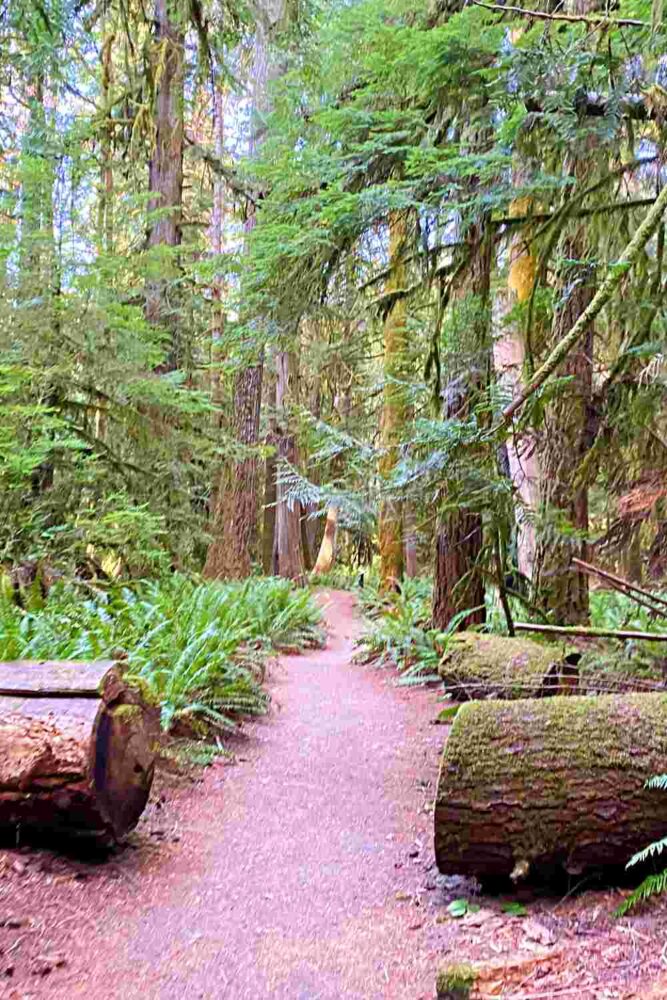
5. Moments in Time Trail
Length: 0.8 miles loop (15-30 minutes)
Difficulty: Very easy
Elevation Gain: 9 feet
Trailhead: Lake Crescent Lodge. There are also connector trails from the Marymere Falls Trail and the Storm King Ranger Station
This is the best trail in Olympic National Park if you want to learn more about the history and ecology of the forest.
The flat, easy loop through a small area of old growth forest on Barnes Point near Lake Crescent Lodge is one of several very easy trails Olympic National Park has. But it has the added bonus of multiple interpretative signs spaced throughout.
Each sign points out something you can see and explains its significance. These explanations give you a chance to learn more about the forest and connect more deeply to it.
You’ll see large standing dead trees, tree stumps and downed logs of ancient trees that provide essential habitats for dozens of animals. You’ll start to appreciate how trees or various heights and ages, developed over a period of 250 years, provide a multi-layered canopy to the forest.
You’ll also learn about nurse logs and see this method of growth and regrowth in action. You’ll notice remnants of logging in this area and learn which trees grow quickly to then provide the right environment for taller but slower-growing trees to take hold.
This is not only one of the best short hikes << Olympic National Park >>, it’s also a top pick for the best hike Olympic National Park has for kids.
Insider Tips:
There are five access points to the loop
Highlights
- Old growth forest
- Interpretative panels
- Lake views
6. Spruce Railroad Trail

Length: 11.2 miles round trip out-and-back (2.4 miles roundtrip to Devils’ Punchbowl)
Difficulty: Moderate (Easy to Devil’s Punchbowl)
Elevation Gain: 250 feet
Trailhead: There are trailheads at both ends of the trail.
Sometimes called the Crescent Lake trail, this is one of the top trails in Olympic National Park whether you like to hike or bike. You can go as far as the Devil’s Punchbowl for one of the best easy day hikes Olympic National Park has or keep going for a longer hike.
The trail runs along the bed of an old railroad. The railroad was originally built to carry spruce lumber out of the forest to build airplanes in WWI. It wasn’t actually finished until after the war, but was then used for commercial logging until the 1950s.
One of the highlights are two railroad tunnels. The McFee Tunnel was blasted during World War I. This is a popular place to turn around, but you can continue along all the way to the west trailhead. The second, shorter railroad tunnel, the Daley-Rankin Tunnel is 2.8 miles from the east trailhead.
The most popular feature of this trail, however, is the Devil’s Punchbowl. This is a small bay that is semi-closed off from the lake by a long footbridge. The sparkling turquoise waters are perfect for a (chilly) dip on a warm day.
Insider Tips:
- The east trailhead is better if you plan to hike just part of the trail, especially if you want to turn around at Devil’s Punchbowl. The west trailhead is more convenient if you’re staying at Fairholme Campground and there are often fewer cars parked there. This is only really suitable if you plan to hike or bike the whole trail, though.
- If you have two vehicles in your group, you could park at both ends and do a key swap so you can all hike the full trail, but in one direction only.
- A great way to do the whole trail is to rent a bicycle (or take your own) and cycle the trail.
- The tunnel is very dark. If you plan to walk through it, I recommend taking a flashlight (your camera flashlight doesn’t really cut it). You can pick one up on Amazon here if you need one.
- Pets on leashes are permitted on the Spruce Railroad trail.
Highlights
- Swimming at Devil’s Punchbowl
- Lake views
- Old rail tunnel
Sol Duc Valley Hikes
Some of the really good hikes in Olympic National Park are in the Sol Duc Valley. Without a doubt one of (if not the) best waterfall hikes in Olympic National Park is here, as well as some short, easy hikes that round out your trip to this part of the national park. There are longer Sol Duc hikes available too, but these are my personal favorites.
READ MORE: Best Sol Duc Hikes
7. Sol Duc Falls

Length: 1.6 miles return out-and-back
Difficulty: Easy
Elevation Gain: 200 feet
Trailhead: Sol Duc Trailhead, at end of Sol Duc Road.
The hike to Sol Duc Falls is one of the Olympic National Park must do hikes. The fairly flat terrain, relatively short distance and stunning waterfall make this one of the best family hikes in Olympic National Park.
The trail heads off through old growth forest. After about half an hour, you’ll see the historic Canyon Creek Shelter through the trees off to your left. A few more yards and you’ll arrive at a wide bridge over the Sol Duc River. The falls are nearby and there are several viewing areas.
Sol Duc Falls are 48 feet high and split into three or four different streams, depending on their volume, as they drop into a narrow ravine.
The river makes a quick 90-degree turn right at the falls, and then again just after, so the falls are at an odd angle across the main flow of the river. Their unusual shape and situation make them especially beautiful.
When you’ve had your fill of the falls, you can return the way you came, or continue in a loop along Lover’s Lane or on to Deer Lake or the Sol Duc River Trail.
Insider Tips:
- Get there early to avoid the crowds and get a parking spot, especially in summer, when the park gets extremely busy.
- There is a reasonably-sized parking lot at the trailhead. However, if it’s full and you’re up for a longer hike, you can combine this with the Lover’s Lane Trail by starting at the Sol Duc Hot Springs back down the road or start at the Sol Duc Campground and follow a trail from there that connects just after the start of the main Sol Duc Trail. This creates a 6.0-mile loop trail that goes through the campground and down near the river as well.
- If you’re a serious photographer, you’ll want special filters, lenses and a tripod to get a long exposure, which creates that soft flowing look. If you have an iphone, you can create the same look more easily. Take the photo with “live” on, then when you look at the photo, click on the small down arrow next to “live” in the top left corner and choose “long exposure” from the drop-down menu. That’s how the photo above was taken.
Highlights:
- Old growth forest
- Waterfall
READ MORE: Sol Duc Falls Trail Guide
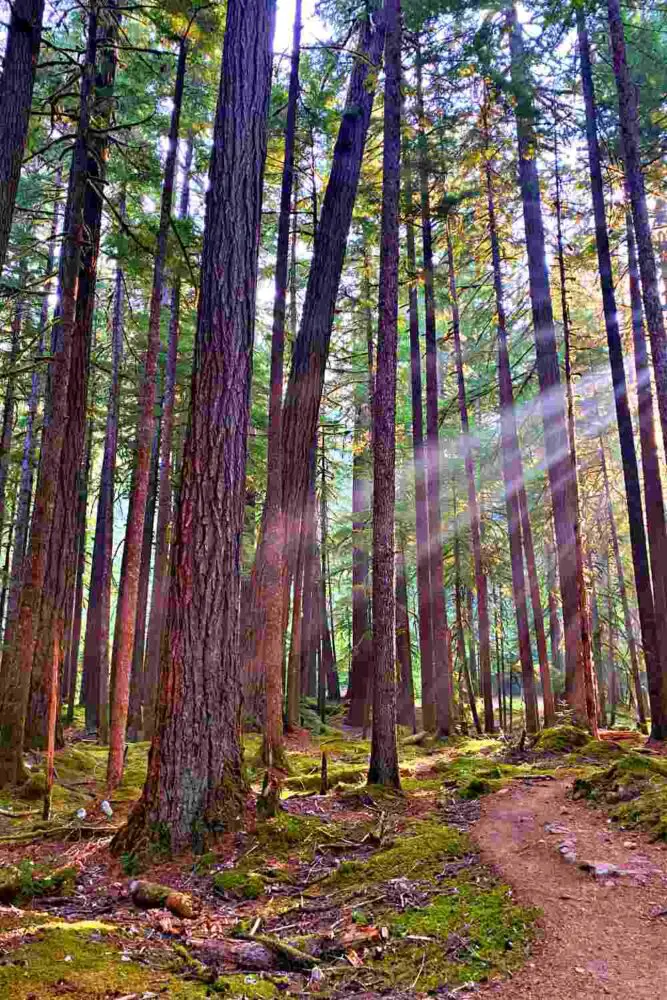
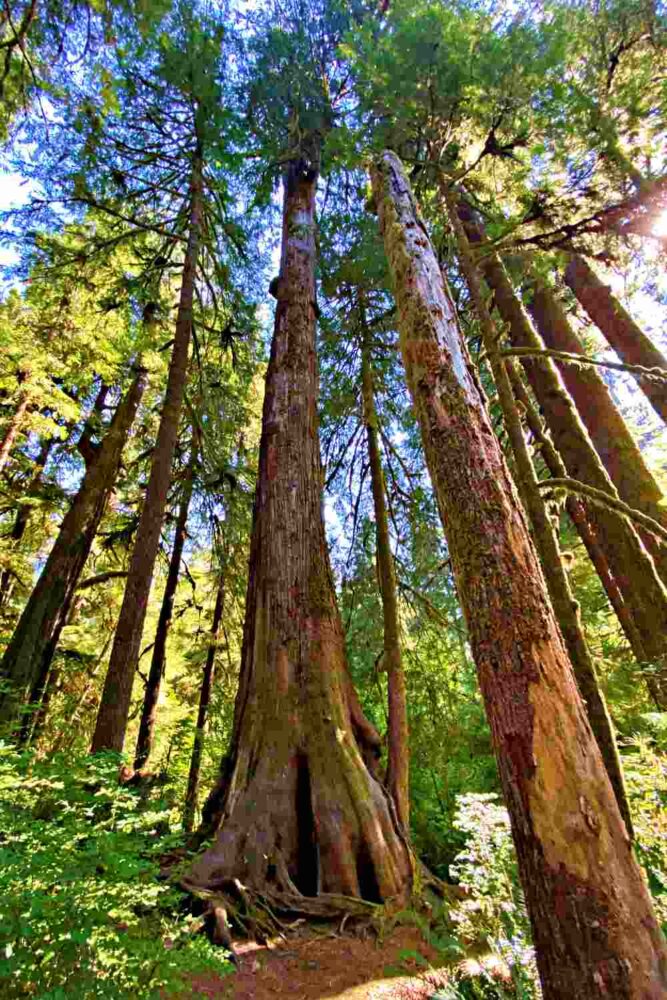
8. Ancient Groves
Length: 0.6-mile loop
Difficulty: Easy
Elevation Gain: 52 feet
Trailhead: On the side of the Sol Duc Hot Springs Road, about 9 miles from the entrance station. There is a sign and small parking lot/ pullout on the right side of the road.
This self-guided nature trail through a magical grove of ancient giants is one of the top day hikes in Olympic National Park. It’s a great option if you’re looking for easy hikes. Olympic Peninsula is home to several pockets of old growth forest with trees that are more than 750 years old!
The trail loops through a grove of trees towering high above, with a lush undergrowth of enormous ferns and thick moss. Moss is also draped over the trunks and limbs of many of the trees. There are more shades of green here than you could ever imagine!
At the far end of the loop, the trail runs along the edge of a small canyon where you can catch glimpses of the Sol Duc River below and the Olympic Mountains beyond. It then loops back through the trees, where you pass several nurse logs, with small trees growing along the top of a fallen log.
Insider Tips:
- If you are driving into Sol Duc Valley from Highway 101, there is a sign. The parking is on your right. However, if you are driving from Sol Duc valley towards Highway 101, there is no sign and it is easy to miss. So, I recommend doing this hike on your way in.
- Be aware that there are two trailheads and two access paths to the main loop. When you come to the second sign that says “Loop”, this is NOT the path you entered in. It can be confusing if you don’t know this.
- If the first parking lot you come to is full, drive a little further along the road and you’ll come to another pullout with some additional parking. There is a trail here that also connects to the loop, so you don’t need to walk back to the other parking lot to start the hike.
Highlights:
- Old growth forest
- View of Sol Duc River in small canyon
READ MORE: Ancient Groves Trail Guide
9. Salmon Cascades

Length: 190 feet each way, out and back
Difficulty: Easy
Elevation Gain: 0 feet
Trailhead: 5 miles up Sol Duc Hot Springs Road from Highway 101, on the right side.
This is one of the super short hikes in Olympic National Park, but it packs a punch. The trail is wide and flat and soon ends at a viewing platform. It’s not the best option if you are looking to get out and hike, but is one of the best trails at Olympic National Park to see nature at its most interesting.
The 11-foot waterfall, which cascades over several short but dramatic layers, is beautiful and definitely worth seeing. However, the main attraction are the salmon and trout that jump up this waterfall on their way up river to return to the part of the river where they were born.
As soon as they are old enough, young salmon born in the upper reaches of the Sol Duc River head downstream and spend most of their lives in the Pacific Ocean wandering hundreds of miles up and down the coast. But somehow, they manage to navigate their way up river, leaping up this waterfall in the process, to return to exactly the same spot they were born.
They then spawn, with the females laying eggs in a nest they dig in the gravelly river bed, and the males fertilizing the eggs. As soon as they are done, they die, their carcasses creating essential nutrients that feed the river system and surrounding forest.
Insider Tips:
- The falls are beautiful all the time, but to have the best chances of seeing the fish jumping, spring and fall are best. Chinook and coho salmon leap up the cascades in the fall (September – early November) and cutthroat trout and steelhead leap up the cascades in spring (March-May).
- Take video. I usually just take photos, but it is very difficult to snap a photo exactly when a fish is mid-air. It’s much easier to take videos so you can catch them in action.
Highlights:
- Salmon jumping
- Beautiful waterfall
READ MORE: Salmon Cascades Guide
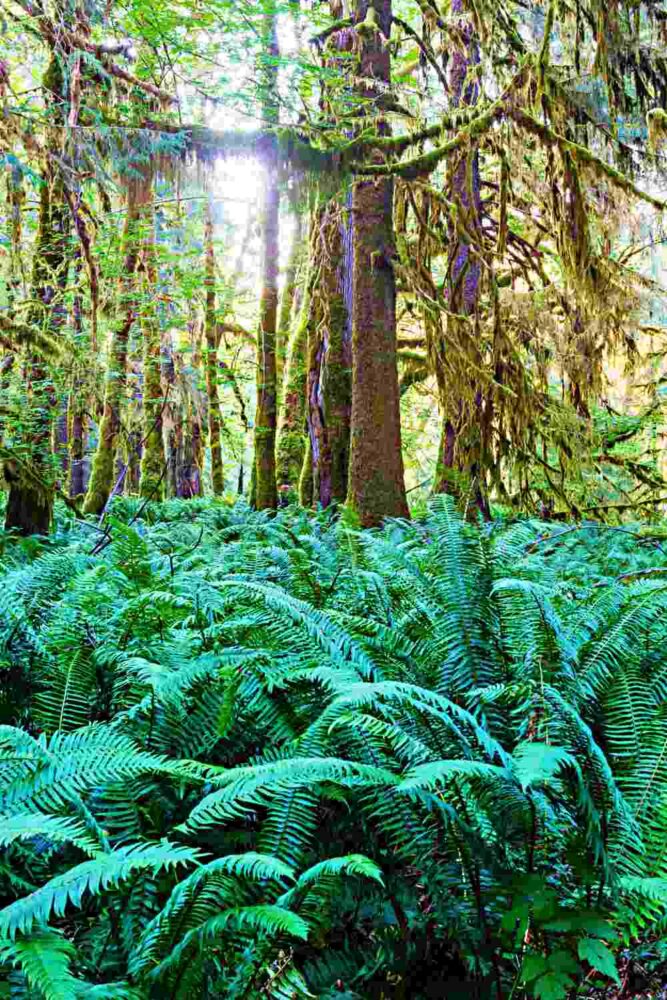
Hoh Rainforest Hikes
The Hoh Rainforest is not the only rainforest in the park, but it does have some of the best rainforest hikes in Olympic National Park. From gigantic trees to magical moss-draped branches, here are the best hikes in Hoh Rainforest.
READ MORE: Best Hoh Rainforest Hikes
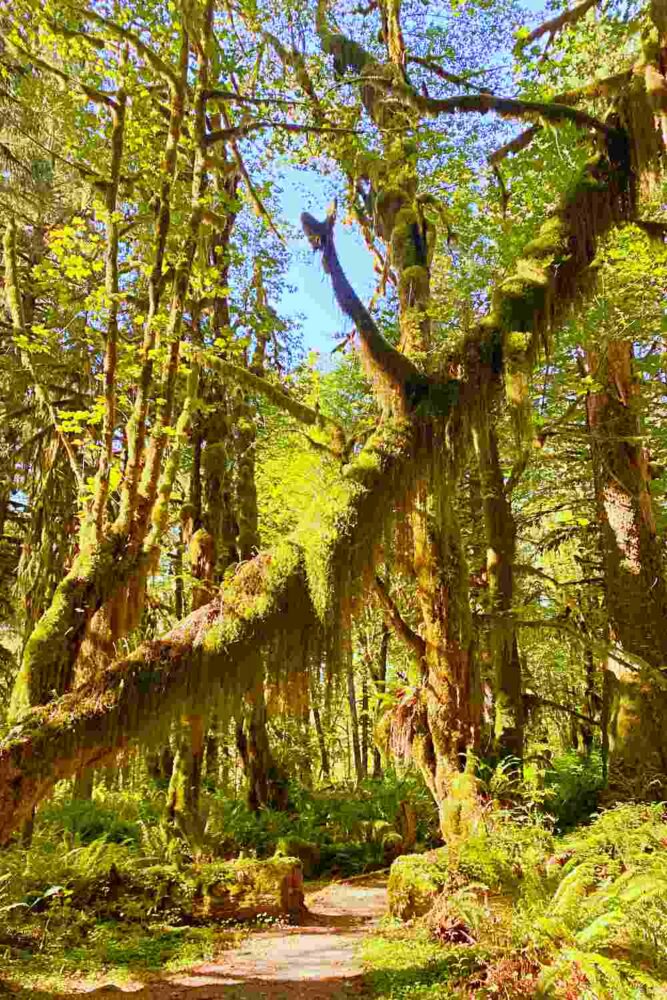
10. Hall of Mosses Trail

Length: 0.8 miles | 30 minutes
Difficulty: Easy
Trailhead: Hoh Rain Forest Visitor Center
This is one of the best hikes in the Hoh Rainforest if you want to get a taste of the temperate rain forest in a bite-sized piece. It’s also one of the easy Olympic National Park hikes, so most people with reasonable mobility can manage it.
The trail takes a fairly short loop through a grove of Bigleaf Maple trees. These trees arch and angle in odd directions as they seek the sun in any way they can. The result is like something in a Dr. Seuss book.
Making them even more magical are the hundreds of varieties of moss and lichen that coat the trunks and drape from branches.
Be sure to take the short side trail about half way around. It ends at the most spectacular section of the grove.
Insider Tips:
- The light is best for photography early in the morning. When the early morning sun hits the moss, turning it into a golden glow, it is truly magical.
- Keep an eye out at the creek at the start/ end of the hike. You may see river otters and/ or salmon here in season.
Highlights: Temperate rain forest with moss
READ MORE: Hall of Mosses Trail Guide
11. Hoh River Trail

Length: The entire trail is over 17 miles long, but there are various popular points to turn back along the way for shorter day hikes.
- First River Access: 0.9 miles each way | 1.8 miles total
- Mineral Creek Falls: 2.7 miles each way | 5.4 miles total
- Cedar Grove: 4.0 miles each way | 8.0 miles total
- Five Mile Island: 5 miles each way | 10.0 miles return
- Glacier Meadows: 17.3 miles each way | 34.6 miles return
Difficulty: Moderate to Five Mile Island, due to its length, not elevation gain, as it mostly flat. Easy if you turn back sooner.
Trailhead: Hoh Rain Forest Visitor Center
This is easily one of the most scenic hikes in Olympic National Park.
The Hoh River runs along the entire length of the Hoh Valley and you can hike a mile or 34 miles!
There are several popular places along the way. As a day trip, most people turn back at Mineral Creek Falls, Five Mile Island or sooner.
If you want to experience the magic of the Hoh Rainforest but with fewer crowds, then this is one of the best trails. Hoh Rainforest tend to be very popular, but the further you go, the fewer people will be around you.
The trail sets off from the Visitor Center and passes through several groves of gigantic trees, enormous ferns and moss. You can take a side trail to see the Hoh River or continue on to the small but lovely Mineral Creek Falls. The waterfalls are nestled up the hill in the middle of lush forest.
READ MORE: Best Waterfalls in Olympic National Park | Forest
Even further along is Five Mile Island. There are restrooms and a grassy area that is an ideal spot for lunch or a snack.
If you’re up for something even more adventurous, you can continue about 18 miles to the end of the trail at Glacier Meadows and then a final push to an overlook with stunning views of Blue Glacier on the side of Mount Olympus.
This is a multi-day trip that requires backpacking and camping along the way. If this sounds interesting but intimidating, I recommend a five-day guided hiking/ camping trip. Having a guide takes a lot of the stress away – though you’ll still need a reasonable level of fitness.
BOOK 5-DAY HOH RIVER HIKING TRIP TO BLUE GLACIER
Insider Tips:
You’ll sometimes come to splits in the trail. Heading out from the Visitor Center, take the left trails. The ones to the right sometimes rejoin the trail, but sometimes they dead end at the river.
Highlights:
- Temperate rain forest with moss
- Waterfall
- River views
READ MORE: Hoh River Trail Guide
12. Spruce Nature Trail
Length: 1.2 miles | 30 minutes
Difficulty: Easy
Trailhead: Hoh Rain Forest Visitor Center
Another of the easy trails in Olympic National Park, this trail has less moss than the Hall of Mosses, but has a greater variety of trees spread throughout new and old growth forest. It’s even flatter than the Hall of Mosses.
At the far end of the loop is the trail highlight – a lovely view of the Hoh River. There are several interpretative signs along the way explaining some of the features of the forest like nurse logs.
Roosevelt elks are often seen on this trail.
Insider Tips:
The Spruce Nature Trail and the nearby Hall of Mosses Trail are by far the two most popular of the best hikes Hoh Rainforest has. If you get there in the morning, most people head to the Hall of Mosses first, so if you head to the Spruce Nature Trail, you have a better chance of having the rain forest more to yourself. Later in the day, it will make little difference, though.
Highlights:
- Old growth temperate rain forest
- View of Hoh River
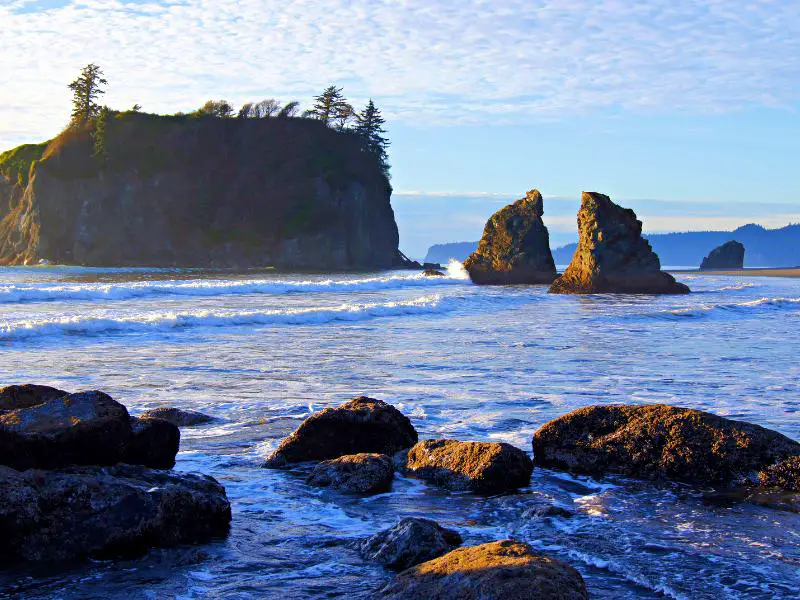
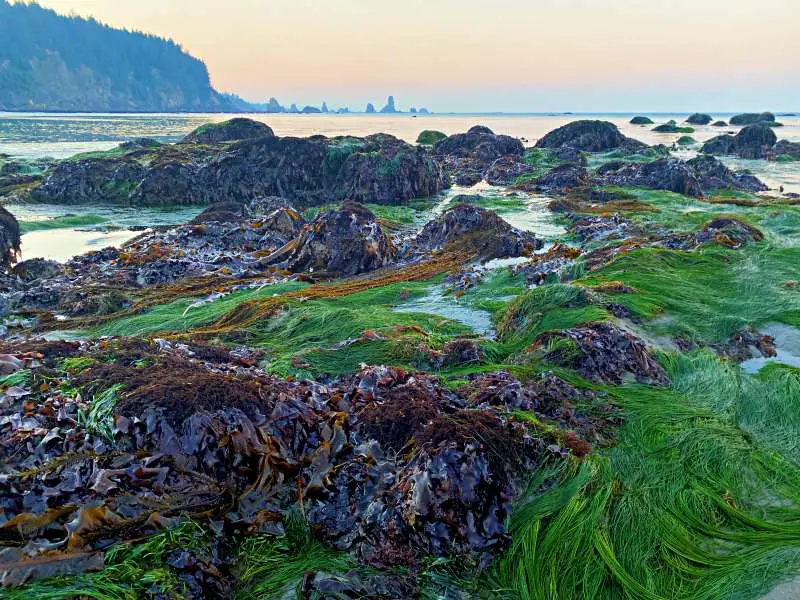
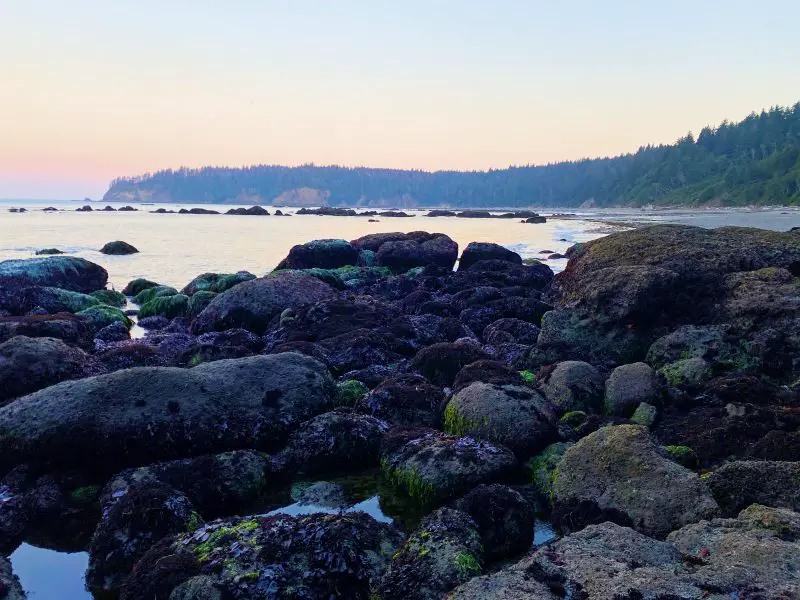
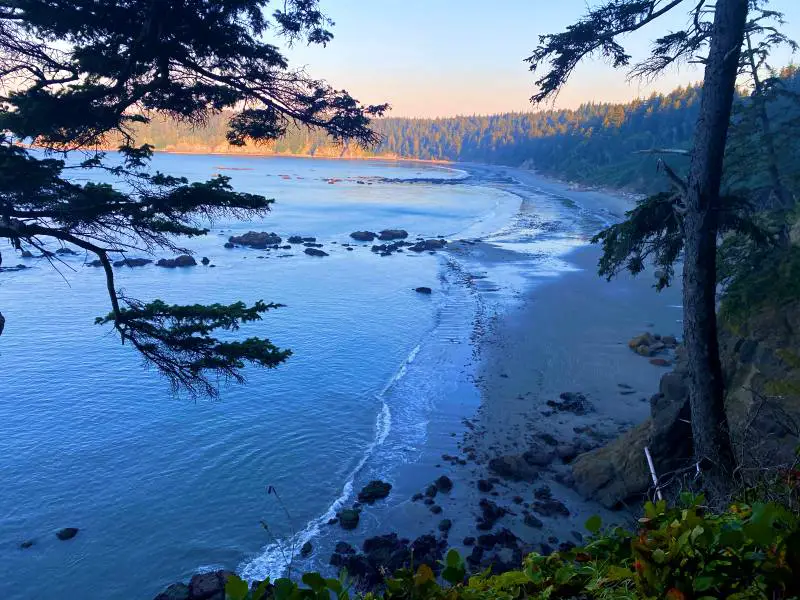
Olympic National Park Beach Hikes
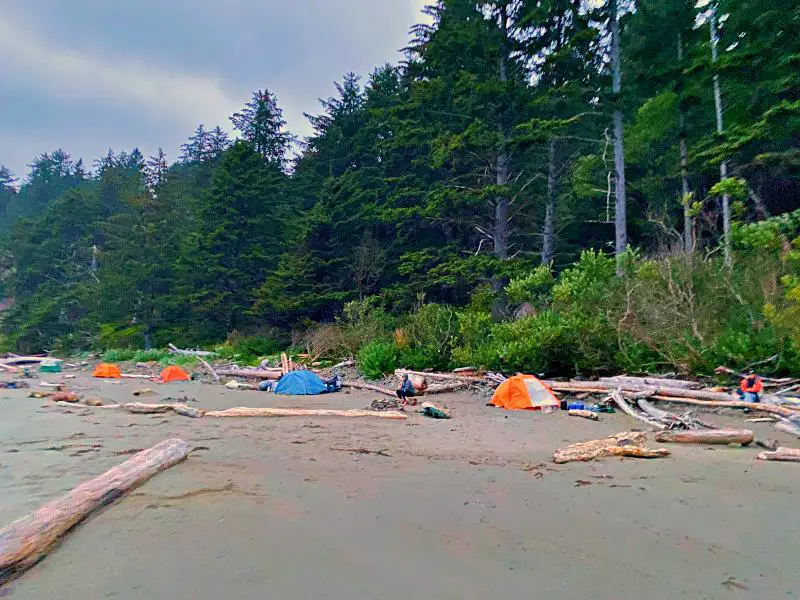
The dramatic windswept beaches of the Pacific Northwest are windy, often foggy – and incredibly beautiful. Hikes here are a mix of hikes through the forest to get to beaches and hikes along the beaches themselves.
READ MORE:
Best Olympic National Park Beaches
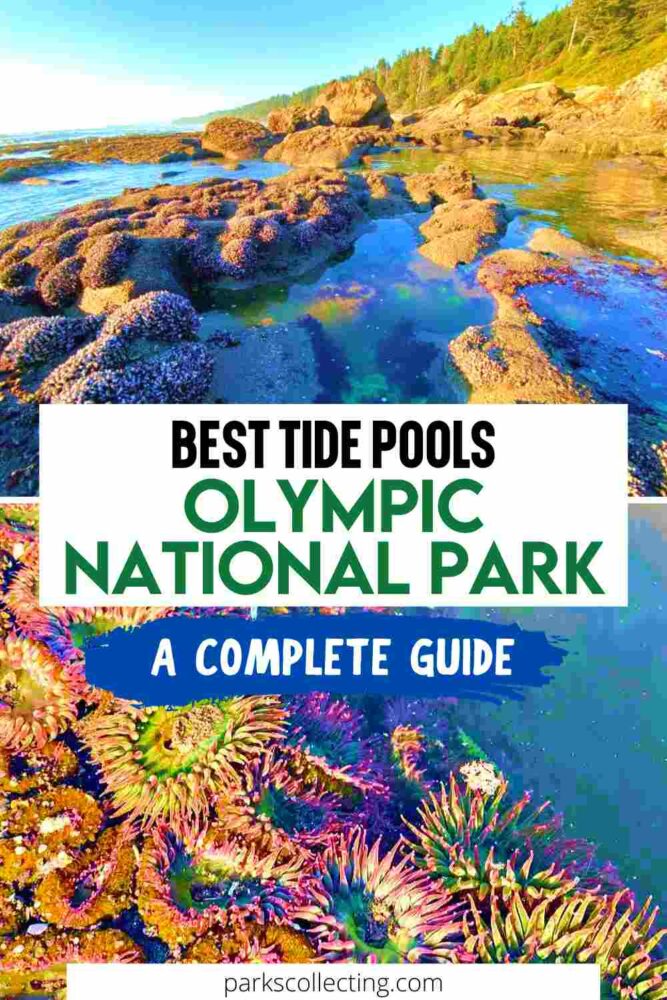
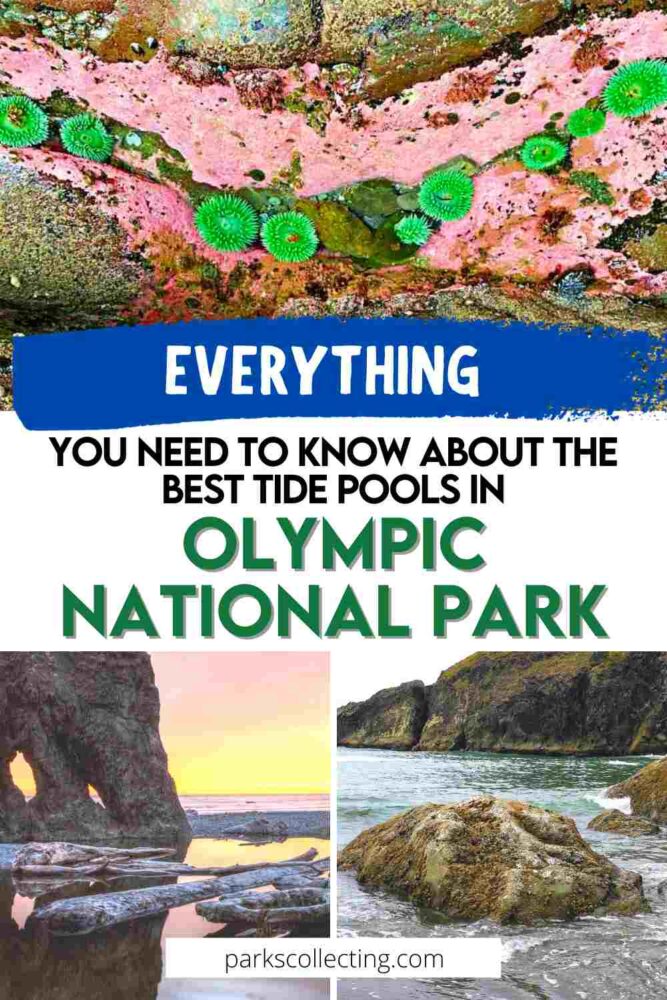
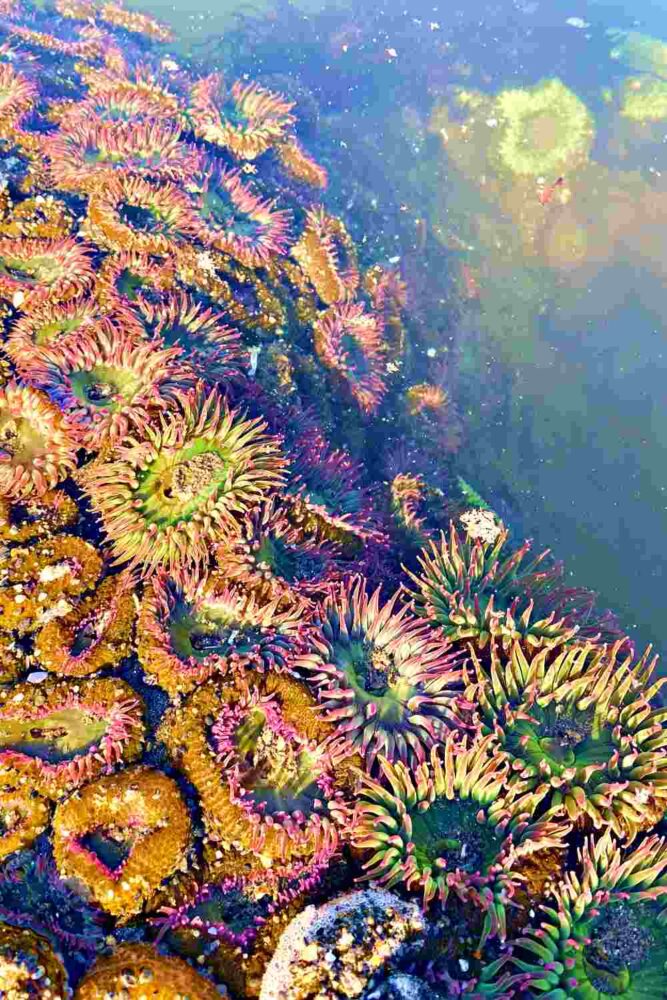
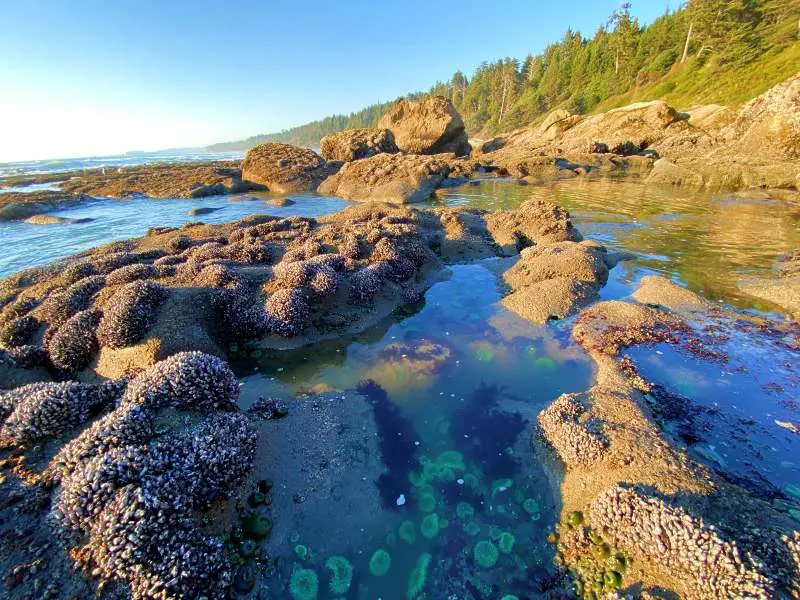
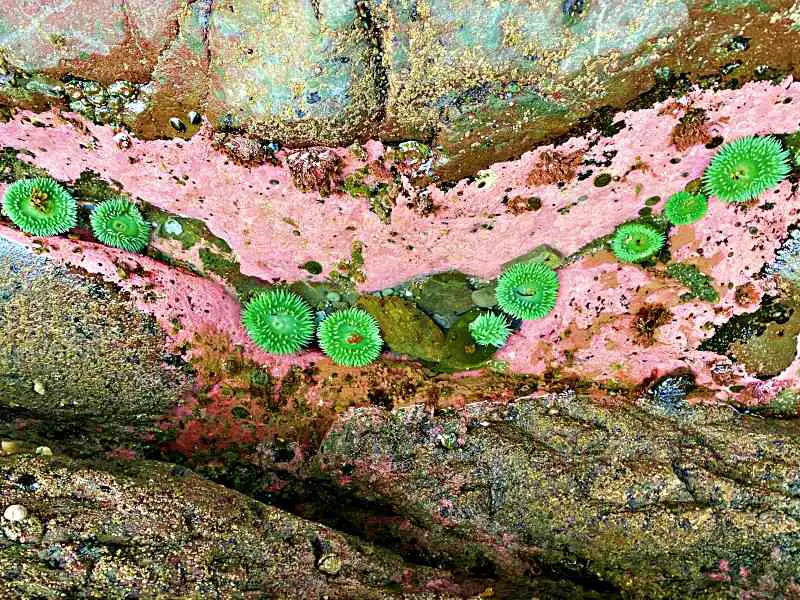
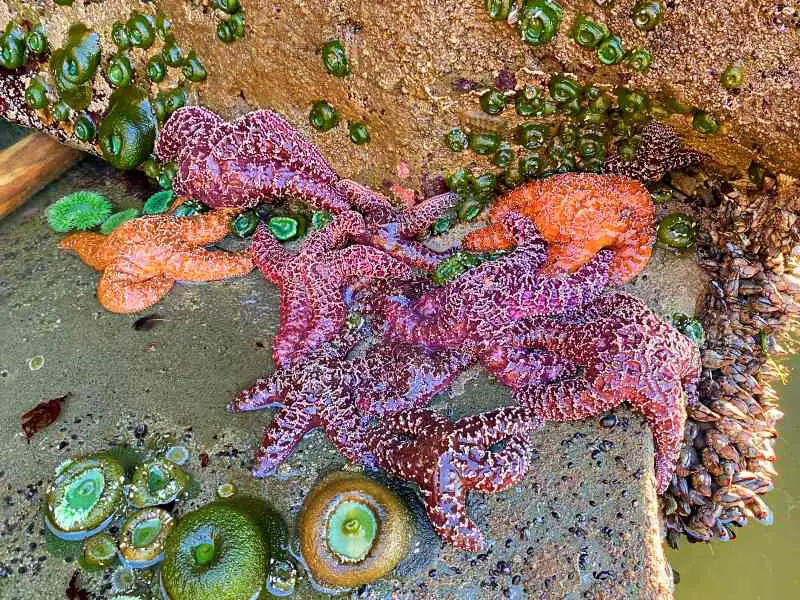
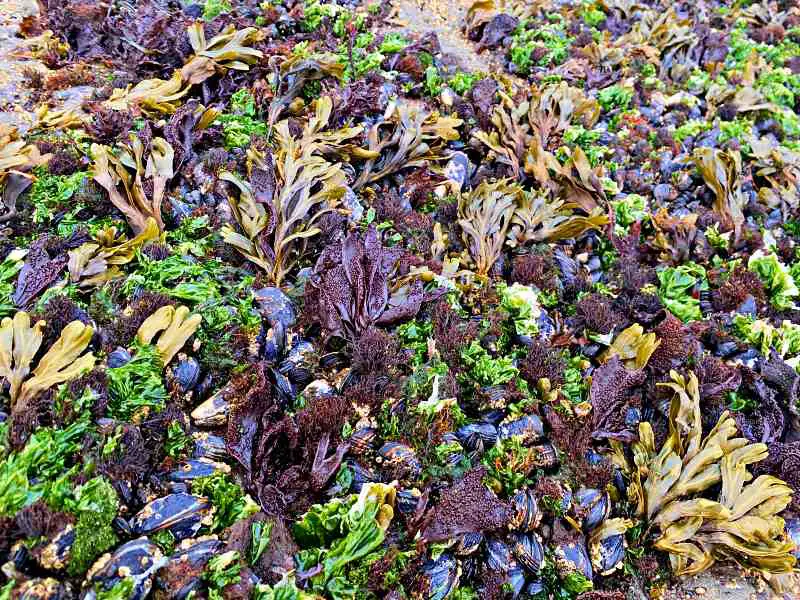
Best Tide Pools in Olympic National Park
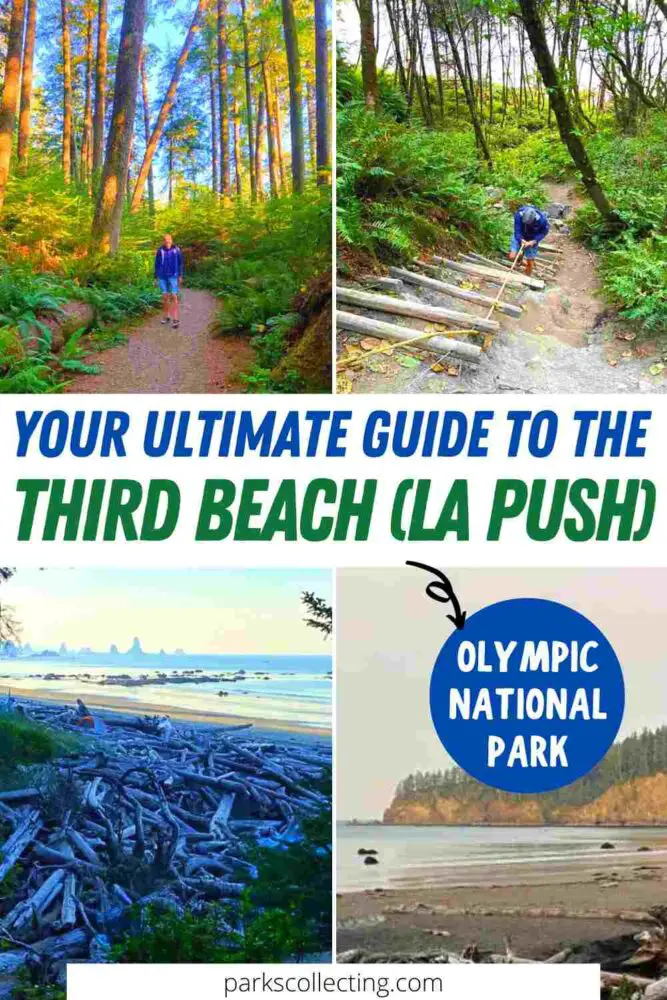
13. Third Beach Trail, Olympic National Park
Length: 1.4 miles | 45-60 minutes each way
Difficulty: Easy – Moderate
Third Beach Trailhead: Third Beach parking lot on La Push Road. It’s a 15-minute drive from Forks. Coming from Forks, it’s before Second Beach.
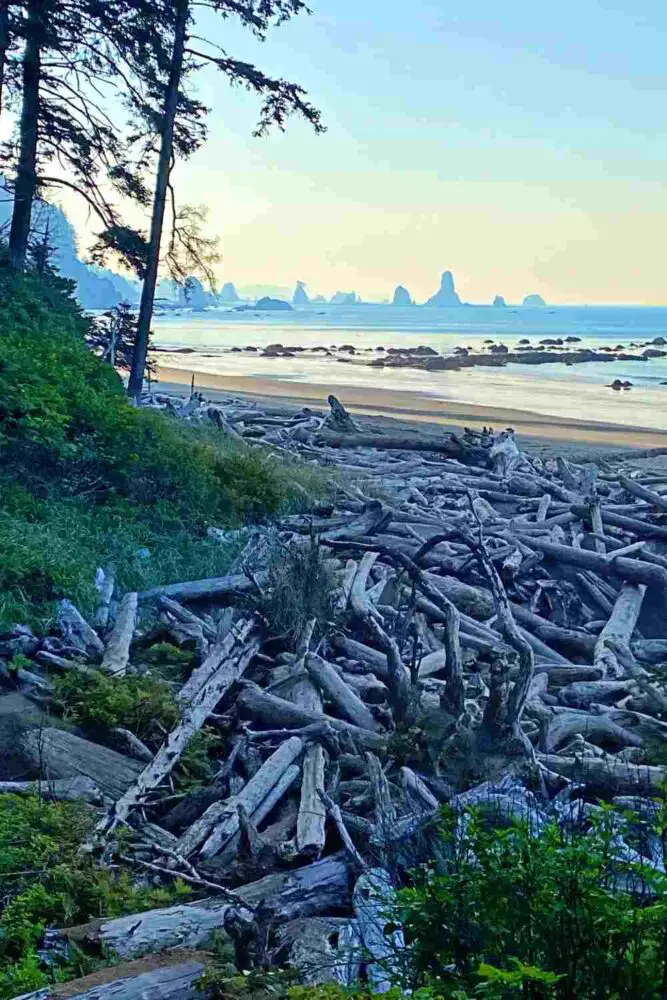
The Third Beach hike is the longest of the hikes to the southern beaches, but if you include the beach as well as the forest, is easily one of the most scenic hikes Olympic National Park has.
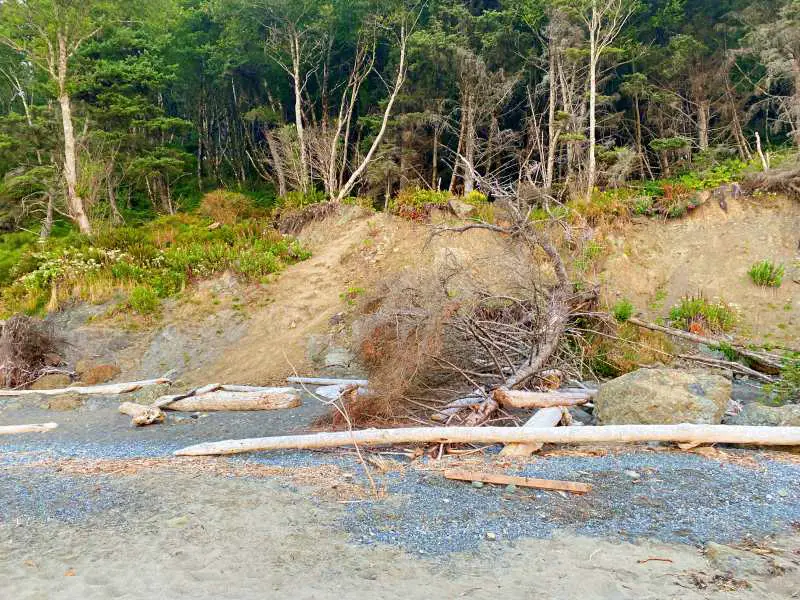
Most of the trail is a gradual descent through coastal forest with towering hemlock trees, enormous ferns plus moss, lichens and various fungi. After about a mile, the trail narrows and starts to descend.
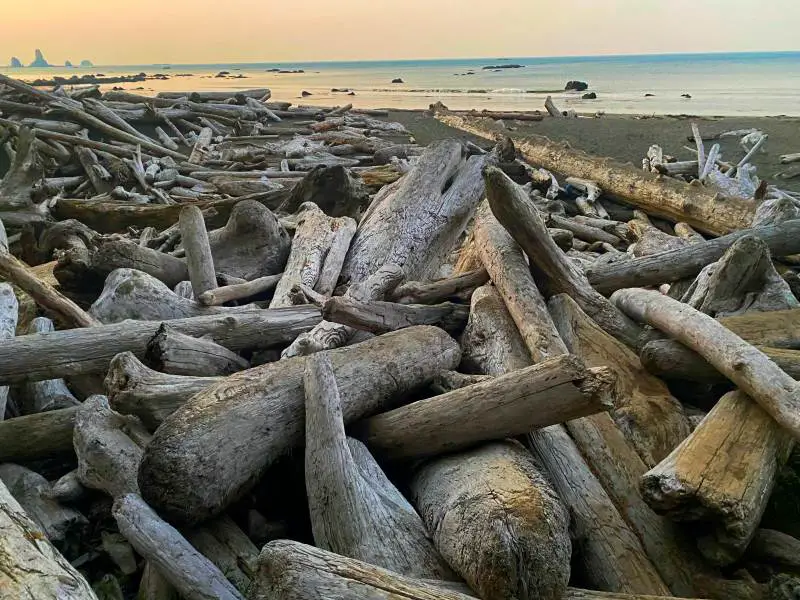
Most of the elevation change is in the last 0.4 miles. This section can be muddy and slippery after rain. Just before you get to the beach, there’s a breathtaking view of the beach through the trees with driftwood in the foreground.
The final descent to the beach gets a little rougher, but soon spits you out at a small creek and a large pile of driftwood. You need to climb over this mass of tree-trunk-sized driftwood to get to the beautiful sandy beach.
Huge piles of driftwood, off-shore sea stacks and a coastal waterfall dropping right into the ocean make this is one of the most dramatic beaches on the Olympic coast. This view alone is why this hike gets my vote as one of the best hikes in the Olympic Peninsula.
Insider Tips:
- Get there early. The parking lot at Third Beach is just 20 spaces
- When you reach the beach, turn around and look for the small sign posted high up a tree near the entrance. This is a marker indicating where the trail is back to the parking lot so you can find your way back easily from the beach.
- Time your visit for low tide. If you want to explore the rock pools, you’ll need to visit at low tide. Plan to arrive at the beach at least 30 minutes before the lowest tide so you have sufficient time to spend there before your return hike.
Highlights:
- Coastal forest
- Beach with sea stacks and driftwood
- Coastal waterfall
READ MORE: Third Beach Guide
14. Second Beach Trail, Olympic National Park
Length: 0.7 miles | 20-30 minutes each way
Difficulty: Easy – Moderate
Trailhead: Second Beach Trailhead
This is arguably the best hike in Olympic National Park if you’re looking for a fairly easy forest walk and enjoy stunning beach views and tide pooling.
The Second Beach hike has some up and down sections and a steep descent to the beach near the end, but is manageable by most people with reasonable mobility.
The trail starts very wide and mostly flat and is very easy to follow. It passes a chain wire fence and private access gate to the Lonesome Creek Hatchery, which is not very pretty, but it soon heads deeper into the forest. The trail crosses a small creek and descends slowly through towering trees and past enormous ferns, winding gently around small marshes.
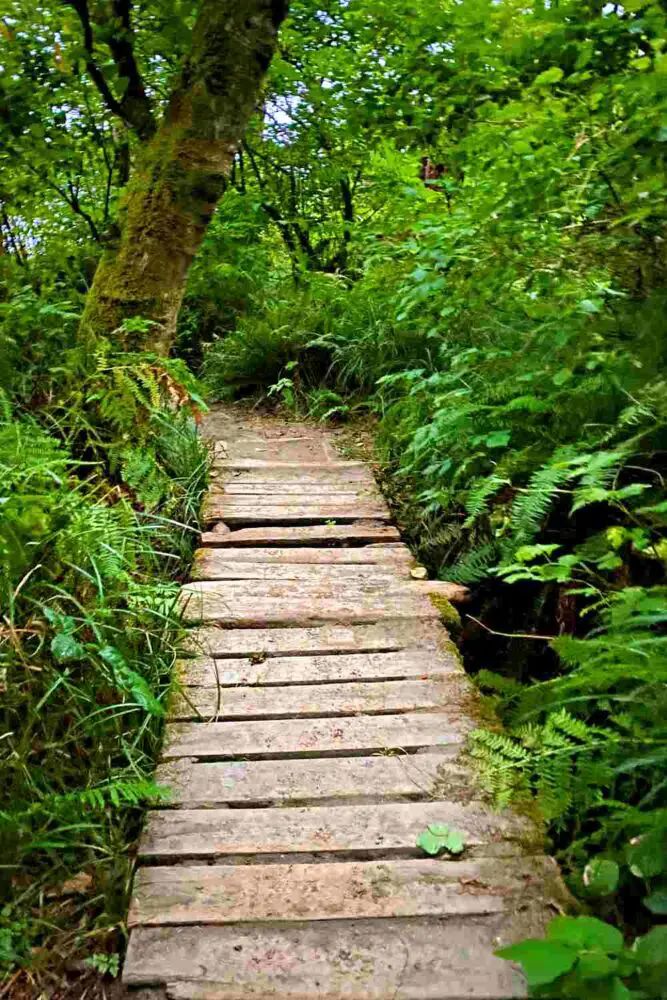
Near the end, a series of wide steps switchback down a hill. This stepped section can be muddy and slippery in the wet season, so take care. A couple of minutes before you arrive at the beach, you can see the ocean through the trees. It’s just another couple of minutes from there down to the sand.
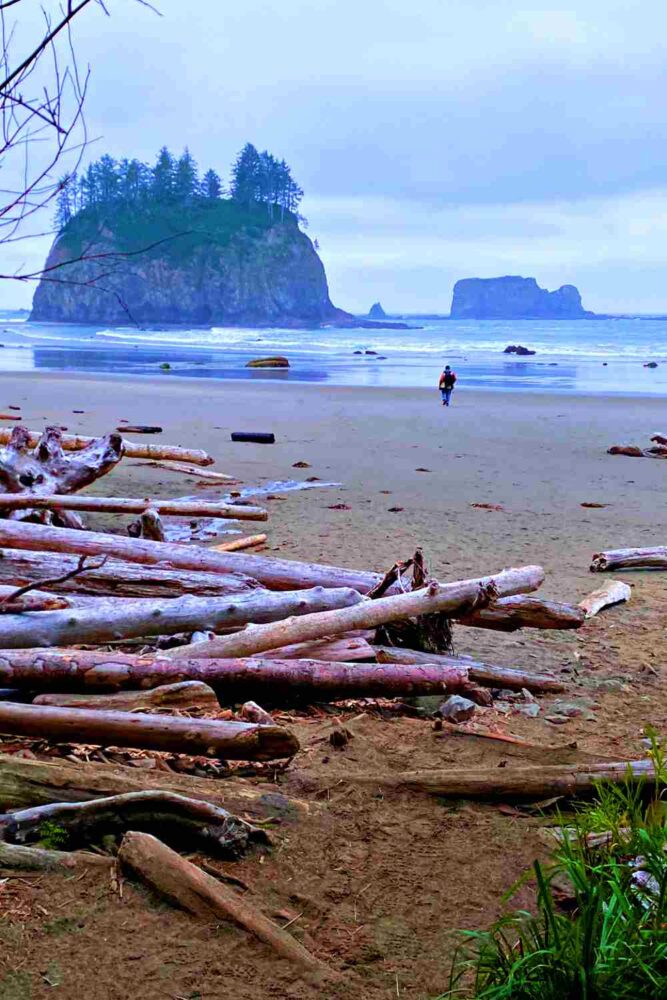
When you arrive at the beach, there may be a pile of driftwood at the entrance that you need to climb over. I’ve been there when you could walk straight on to the sand, so be prepared for any conditions.
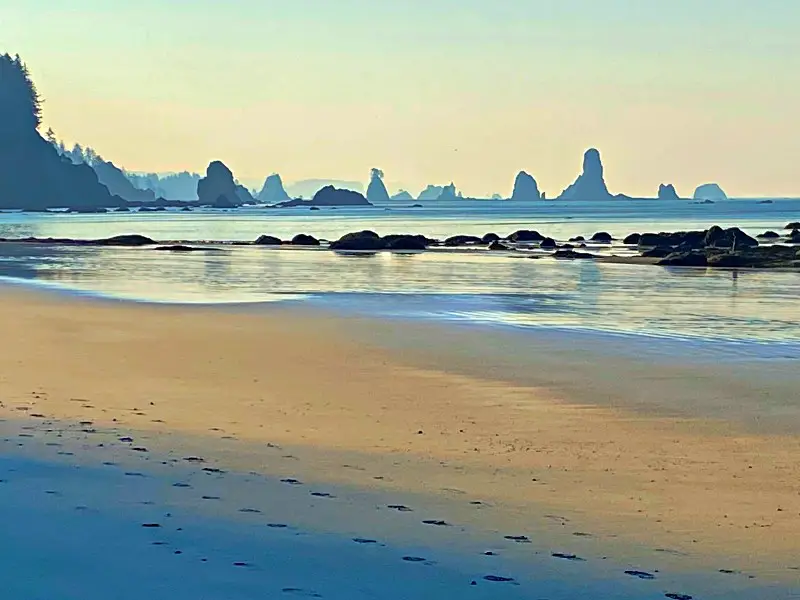
A wide sandy cove framed by rocky headlands and a natural arch, dramatic sea stacks and tiny islands rising out of the crashing surg, and piles of huge driftwood make for a breathtaking scene.
Insider Tips:
- Note the entrance/ exit to the beach so you recognize it when you return. Look for the circular sign with alternating black and red quarters posted high up a tree near the entrance. This is a marker indicating where the trail is back to the parking lot so you can find your way back easily from the beach.
- Time your visit for low tide so you can explore the rock pools. Plan to arrive at the beach at least 30 minutes before the lowest tide so you have sufficient time to spend there before your return hike.
- Be there for sunrise and/ or sunset if possible.
In the early morning, you’ll have the beach almost to yourself, as most beach campers are still asleep and few day trippers get there that early. The light is beautiful and the early morning fog makes for magical photos of the ocean and sea stacks.
The sunsets are often spectacular here, too. If you do either sunrise or sunset, unless you’re beach camping, you’ll need to hike to/ from the beach in the dark. You’ll need a good headlamp. You can get a headlamp here if you need one (or two).
Highlights:
- Coastal forest
- Beautiful beach with driftwood and sea stacks offshore
READ MORE: Second Beach, La Push Guide
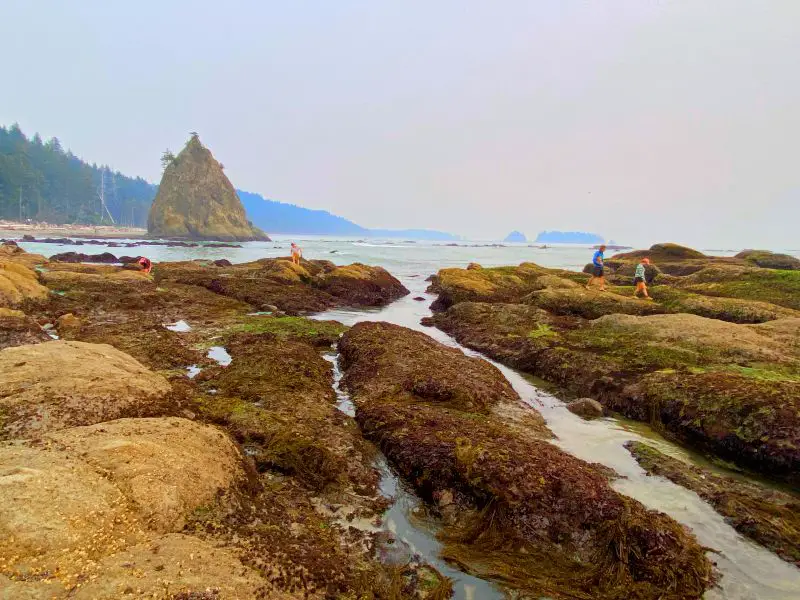
15. Hole in the Wall – Rialto Beach Hike
Length: 3.3 miles round trip
Difficulty: Easy-moderate. It’s flat, but walking in soft sand can be tiring.
Trailhead: Rialto Beach parking lot
From the parking lot, there’s a flat, short path to the beach. This is one of the few Olympic beaches that doesn’t have stairs and/ or a sloped path. The Rialto Beach trail to Hole in The Wall is 1.65-miles each way, but if you have limited mobility and just want to be on the beach and not walk very far, then Rialto Beach is a great option.
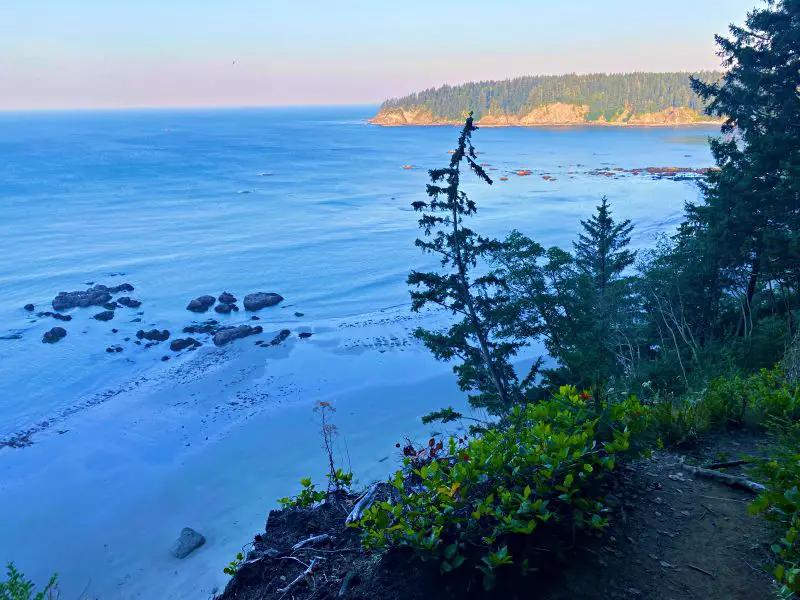
As you look down the beach to your right, you’ll see a small rocky headland far in the distance. This is your destination, Hole in the Wall.
The entire hike is along the beach, which is why this is one of the most beautiful hikes in Olympic National Park.
As you start to walk, keep an eye for birds and marine wildlife. Enormous logs formed from the trunks of fully grown trees, stripped bare by the elements, frequently line the edge of the beach.
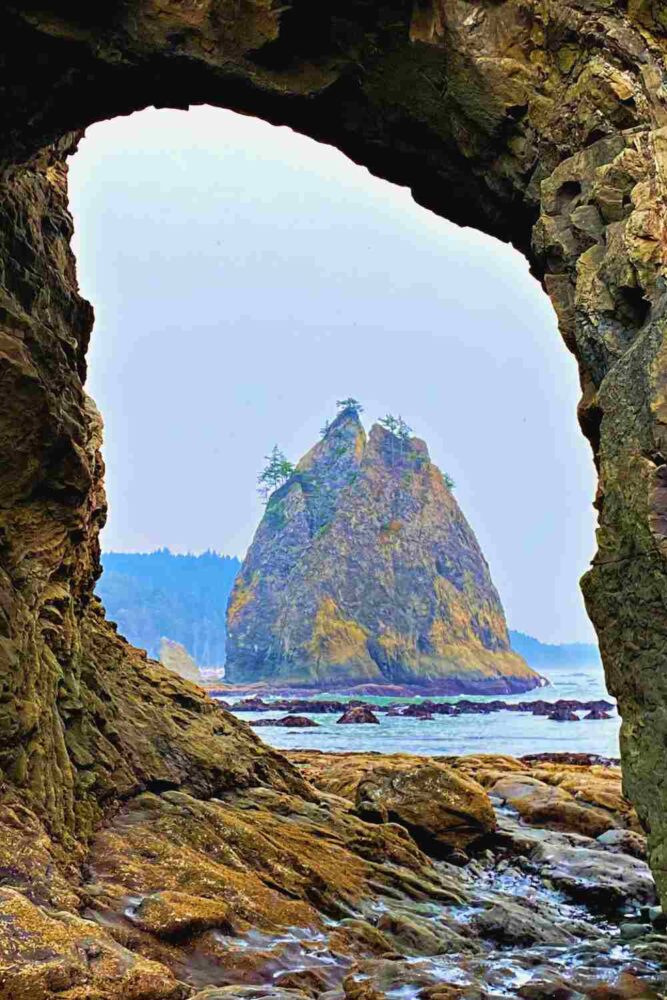
Another thing you’ll notice are the off shore sea stacks. You’ll see many small stacks off shore pretty much the whole way, but the larger and closer stacks await as you get closer to Hole in the Wall.
After 1.65 miles, you’ll come to Hole in the Wall. This is a natural arch carved by the sea over hundreds of years.
The area is a great place for exploring the tidal pools at low tide. The beauty of the area and the great tide pooling are the reasons why this is one of the most popular hikes Olympic National Park has.
Insider Tips:
- Time the hike for low tide. It’s often impossible to walk along the beach at high tide. And, if you want to explore the rock pools and walk through the hole in the wall, you’ll need to visit at low tide.
- Plan time for tide pooling. Aim to arrive at the Hole in the Wall at least 30 minutes before the lowest tide so you have sufficient time to spend there before your return hike.
Highlights:
- Beach
- Driftwood
- Sea stacks
- Hole-in-the-Wall natural arch
- Tide pools
READ MORE: Rialto Beach – Hole in the Wall Guide
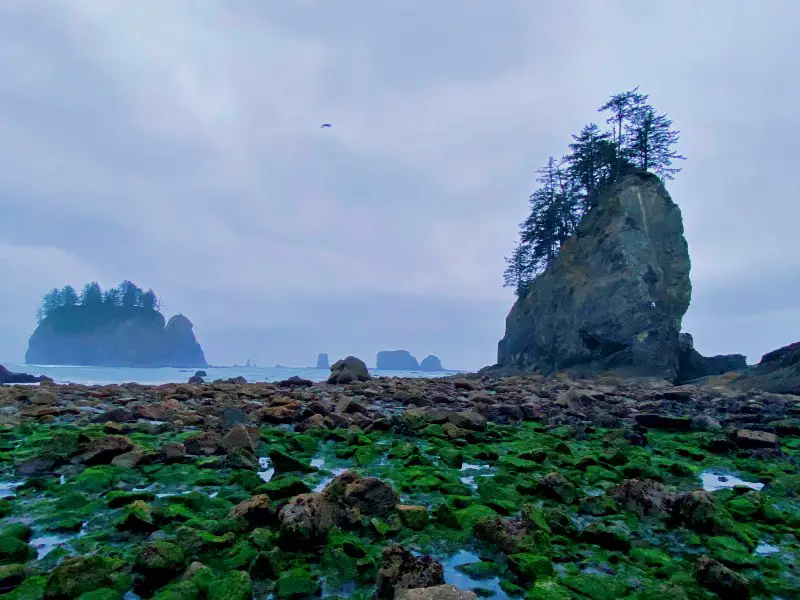
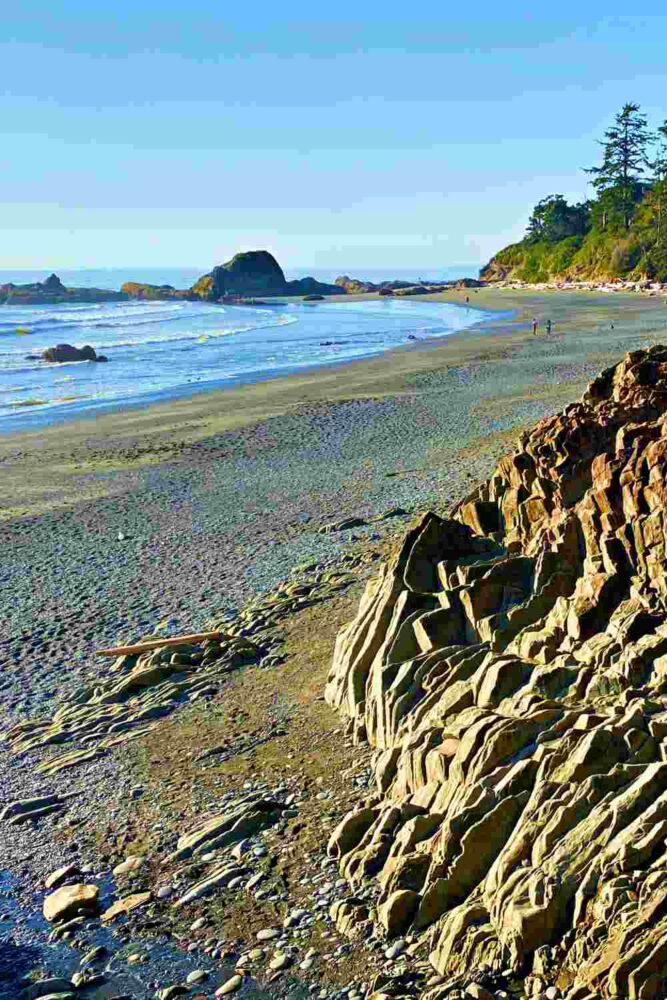
16. Kalaloch Beach 4
Length: 0.2 miles each way to the beach + 0.2 miles along the beach to the tide pools
Difficulty: Easy – moderate. The trail itself is short, but has some elevation change. If you have mobility difficulties, the final section down a rope over some rocks may be impossible. See below for more details.
Trailhead: Beach 4 parking lot
This is one of the most popular hikes Olympic National Park has not so much for the hike itself (which is pleasant but short), but more for the destination.
The trailhead leaves directly from the parking lot and is very easy to see. Soon after, you’ll come to a fork in the path. The path to the right ends at a viewpoint overlooking the beach.
The trail to the left takes you down a hill to the beach. There are several interpretive signs along the main trail explaining more about the forest and the beach.
The trail starts flat and heads through the forest but soon heads down wide stairs to the beach.
Arriving at the beach, you’ll cross a lovely wooden bridge from the hillside to some rocks that stand at the entrance to the beach.
To get down to the beach itself, there is a rope to help you climb down the side of some rocks. They aren’t that high, but they are steep. So, although this is of my favorite best short hikes in Olympic National Park, this section is challenging or even impossible for people with mobility issues.
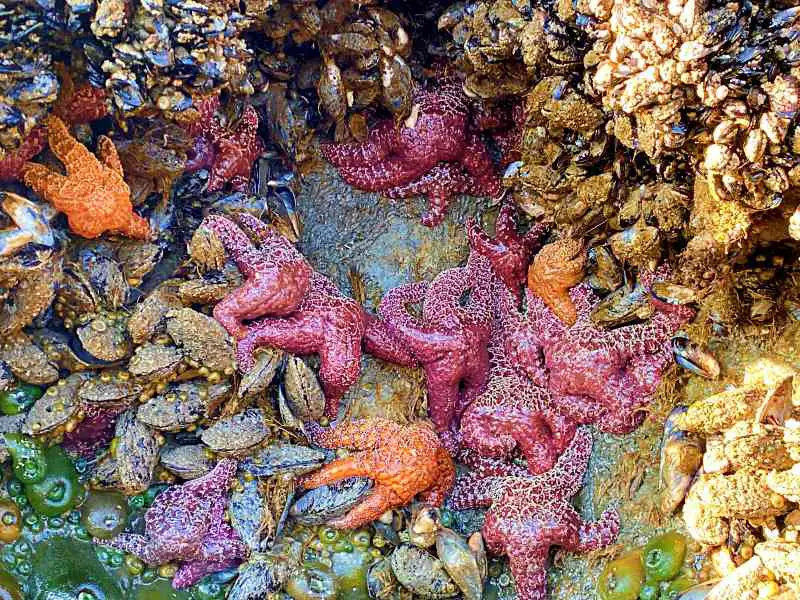
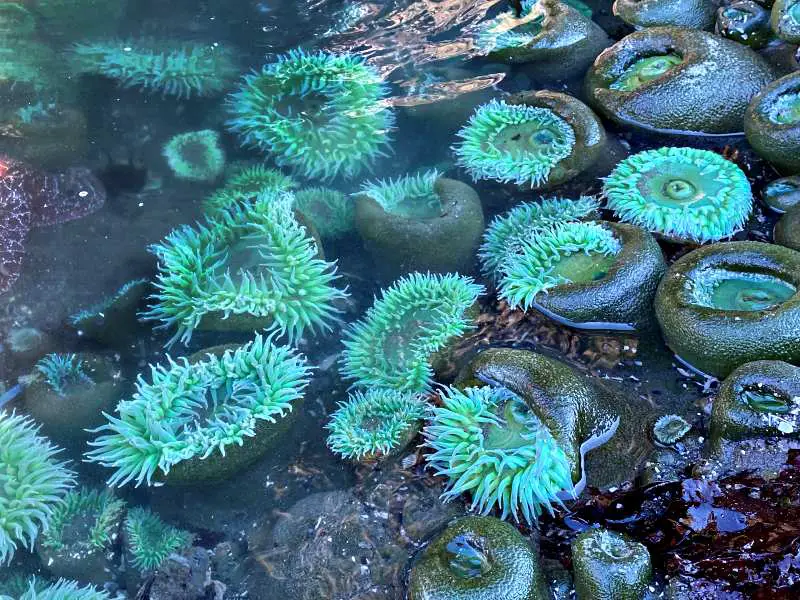
From there, it’s another 0.2 miles along the black and pebbly beach to rocks at the northern end. The northern side of these rocks has some of the best tide pooling in the entire national park.
Insider Tips:
- When exploring the tidepools, you’ll need to clamber over wet rocks that can be steep and slippery. You’ll want to wear good hiking boots or shoes. If you need to get some, take a look at my Guide to Buying the Best Hiking Shoes/ Boots to help you know what to look for and get some recommendations. My top pick is this pair of Salomon Gore-Tex boots.
An alternative to hiking shoes or boots are hiking sandals. These have the advantage of being fine in water as well as having good grip. If you’re interested in buying some, check out my Complete Guide To The Best Hiking Sandals or get my favorite pair: KEEN Unisex-Adult Targhee 3 Open Toe Hiking Sport Sandal - Time the hike for low tide. Plan to arrive at the beach at least 30 minutes before the lowest tide so you have sufficient time to spend there before your return hike.
- If you’re looking for other hikes near Kalaloch, head to Kalaloch Beach to see the Tree of Life
Highlights: Tide pools
READ MORE: Kalaloch Beach 4 Guide
Lake Quinault Hikes
The Quinault section combines some of the best hikes in Southern Olympic National Park with – on the other side of Quinault Lake – the best hikes in Olympic National Forest.
READ MORE: Best Lake Quinault Hikes
17. Maple Glade Rainforest Trail
Length: 0.5 miles loop
Difficulty: Easy
Trailhead: Maple Glade Rain Forest Trailhead
This is one of my favorite Olympic National Park easy hikes.
It’s a short loop through a magnificent glade of Bigleaf Maple Trees. These trees twist and turn into fantastical shapes. They are coated and draped in golden moss that glows when the sunlight shines on it through the trees.
Under foot are enormous ferns and, on the way, you’ll pass ponds that later in the dry season (late summer/ fall) are lacking in water but filled with lush green grasses.
Look down to find banana slugs and through the trees, where you may see Roosevelt Elk.
You can take the loop in either direction. At the far end of the loop, you can either continue around the loop or take the trail that continues on the Kestner Homestead.
Insider Tips:
- There are often ranger-led hikes into Maple Glade. Check the NPS website for the dates of your visit.
- The light is best early morning, when the sunlight makes the moss glow.
Highlights: Temperate Rain Forest with maple trees and moss
READ MORE: Maple Glade Rainforest Trail Guide
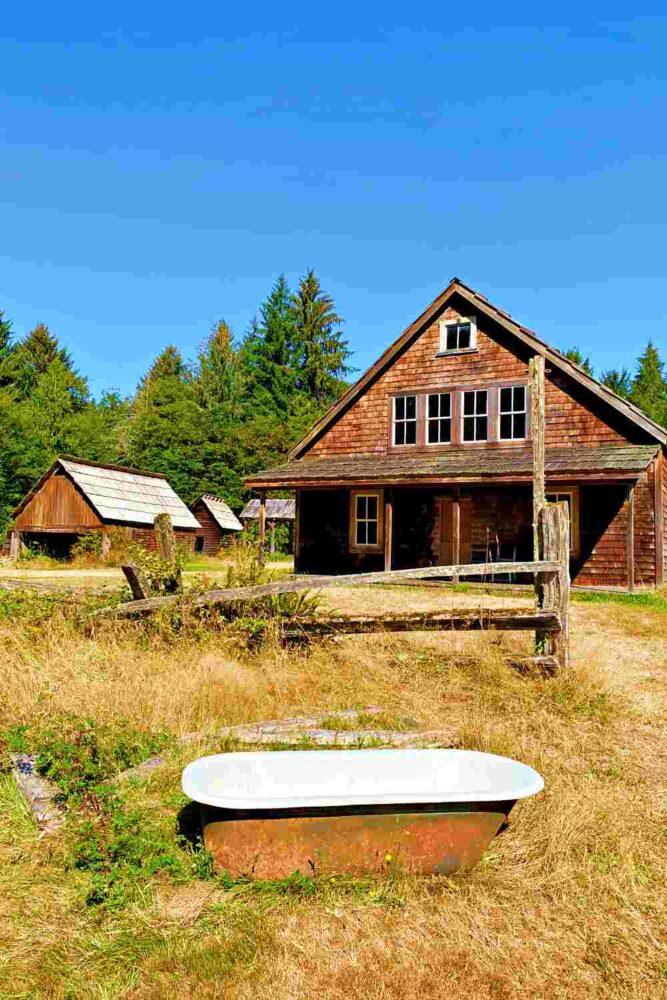
18. Kestner Homestead Trail
Length: 1.3-mile loop
Difficulty: Easy
Trailhead: Maple Glade Rain Forest Trailhead
One of the best easy hikes Olympic National Park has, the Kestner Homestead features a stunning rain forest and a step back in time.
The trail starts at the Maple Glade Loop and continues through the temperate rain forest before emerging into a clearing where the historic farm is located.
There is a wooden farmhouse and several sheds with wood shingled roofs. There are also pieces of abandoned, rusty farm equipment and cars scattered around the property, plus a bathtub sitting in a nearby field. There are some small pastures and a tiny orchard.
The Kestner Homestead Site, built in 1897 and rebuilt in 1900-1905, is the oldest surviving settler-built homestead in the Quinault River Valley. It’s listed on the National Register of Historic Places.
The loop trail continues down the main farm road and across a modern bridge before veering off to the right alongside Kestner Creek through mostly unexciting second growth forest. It soon emerges back at the ranger station.
Insider Tips:
The loop can be hiked in either direction. I prefer clockwise because then you visit Maple Glade first and get a real sense of the forest as it was before it was farmed, which helps you appreciate even more the task early pioneers faced when turning the forest into farmland.
Highlights:
- Temperate rain forest
- Historic homestead/ farm
READ MORE: Kestner Homestead Trail Guide
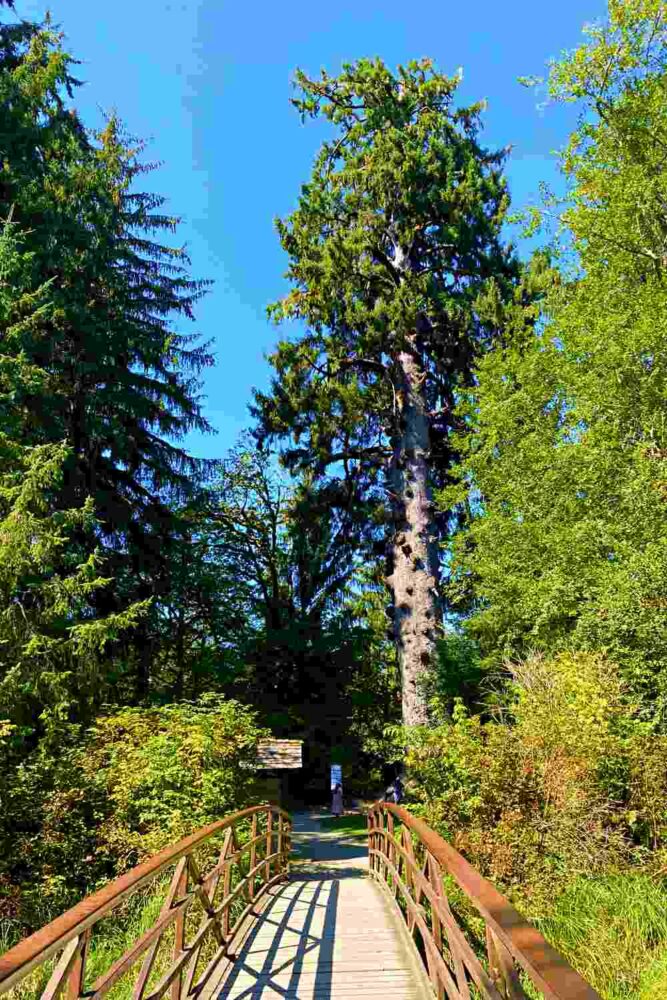
19. Largest Spruce Tree Trail
Length: 0.4 miles out-and-back
Difficulty: Very Easy
Trailhead: Just past the Rain Forest Resort Villages’ general store on South Shore Road. Across the street from the parking lot is a small sign indicating the start of the trail to the “World’s Record Sitka Spruce”.
This is one of the best Olympic National Forest hikes since it technically lies just outside the national park.
A flat, fairly wide and very easy to follow trail goes through a basic forest before emerging into a clearing. The biggest Sitka spruce tree in the world is across the clearing. There is a small sign nearby giving its impressive statistics.
The tree about 1,000 years old; 191 feet tall; and has a circumference of 58 feet and 11 inches! That’s a big tree! In fact, it is one of the five champion trees in Quinault Valley (the “Valley of the Giants”), and by far the most accessible.
Pose for some photos, admire the trees enormity, ponder what life events this tree has witnessed, then return back to your vehicle.
Insider Tips:
Stop at the nearby Salmon House restaurant for lunch or dinner – they have some of the best salmon you’ll ever eat and lovely views of Lake Quinault from their back porch.
Highlights: Largest spruce tree in the world
20. Cascade Falls Quinault Trail
Length: 1.6-mile loop
Difficulty: Easy
Trailhead: Across the road from Lake Quinault Lodge
There are several interconnected Olympic National Forest hiking trails across the road from the lake’s southern shore. They are all pretty (or very) easy and you can do one or connect several into hikes of varying lengths.
My favorite of these Olympic National Forest hikes, though, is the loop to Cascade Falls. The trail goes through second growth forest with large ferns and tall trees covered in moss. There are several small bridges over creeks.
At the far end of the loop is the slightly underwhelming Cascade Falls. Although the falls aren’t that spectacular, it is the hike itself that is the highlight. It’s a lovely forest walk that is a great introduction to the temperate rainforest.
Insider Tips:
The trail ends back at the road. If you cross the road and follow the path, it winds thorough some buildings before emerging at the lake. It then follows the shore back to the large lawn in front of Lake Quinault Lodge.
Highlights:
- Lovely forest walk
- Small waterfall
- Lake shore stroll at end
READ MORE: Lake Quinault Loop Drive
Map of the Best Hiking Trails in Olympic National Park
This map shows you where these hikes are, but it’s not a detail trail map. For that, it’s worth getting a National Geographic topographic hiking trails map of Olympic National Park before you go.
What to Wear Hiking in Olympic National Park & What to Pack for Hiking at Olympic National Park
There is a large variety of trails in Olympic National Park. Best hike gear recommendations include:
1. Hiking poles
Many of the best day hikes in the Olympics have some elevation change. Hiking poles can help stabilize you and make going up and downhill easier. I used to think they weren’t necessary until I actually tried them and now I seldom hike without them.
I have these Foxelli trekking poles – they are really light weight, adjustable, have several tips and grippy handles. Get them here.
2. Wind breaker/ Rain jacket
A lot of these hikes are in an area called Hurricane Ridge because of the strong winds, rain forests or wind-swept beaches. I recommend taking a rain jacket/ wind breaker and wearing layers that you can take off or put on depending on the weather, which can change throughout the day.
If you need one, I like this Columbia rain jacket for men and this Little Donkey Andy rain jacket for women.
3. Water
Always take more water than you think you’ll need. I love this hydroflask. It’s easy to carry, keeps temperatures well, and comes in multiple colors.
4. Binoculars
These aren’t essential, but there are often birds soaring overhead or wildlife in the distance or marine life at the beaches. So, I like to take binoculars with me when I hike so I can see them up close.
If you’re looking for some, read my guide to The Best Binoculars for the Money or get my top pick here.
5. Sun hat, sunglasses and sun screen
Many of these hikes involve some (or a lot) of exposure to the sun, so be sure to wear sunscreen, a good sun hat and sunglasses.
6. Bear Spray
It’s possible that you may encounter black bears on the trails in the woods, especially early summer and fall. Be bear aware and carry bear spray or a bear bell just in case.
7. Winter hiking gear
If you’re hiking in winter (or fall or spring), you will need good microspikes or snow shoes. Read my guides to The Best Microspikes for Hiking and The Best Snowshoes for Beginners if you need to buy some.
8. Day Hike Essentials
Check my list of essential things to take and wear on a day hike to make sure you have everything you need.
9. Sturdy hiking shoes or boots or sandals
You’ll want to wear good hiking boots, shoes or sandals for the best hiking. Olympic National Park has forest trails where there are roots and rocks, and beach hikes that involve walking on slippery wet rocks.
If you need to get some boots, take a look at my Guide to Buying the Best Hiking Shoes/ Boots to help you know what to look for and get some recommendations. My top pick is this pair of Salomon Gore-Tex boots.
An alternative to hiking shoes or boots are hiking sandals. These have the advantage of being fine in water as well as having good grip. If you’re interested in buying some, check out my Complete Guide To The Best Hiking Sandals or get my favorite pair: KEEN Unisex-Adult Targhee 3 Open Toe Hiking Sport Sandal
10. Camera
I love the GoPro HERO 12. It’s designed for travel. It’s water resistant and durable, which is especially important when you might slip and the camera could end up wet. Check current prices on the GoPro HERO 12 here
Tips for Hiking at Olympic National Park
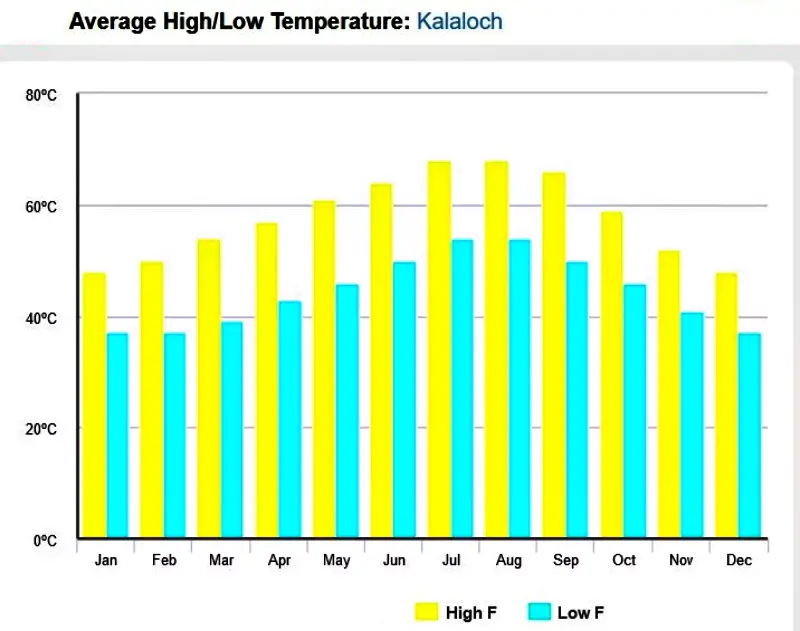
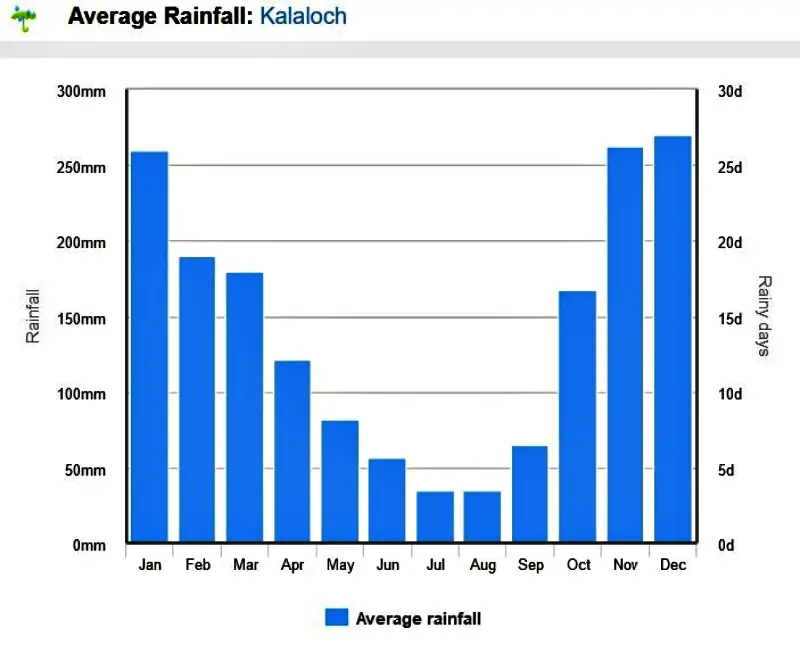
1. Time it right
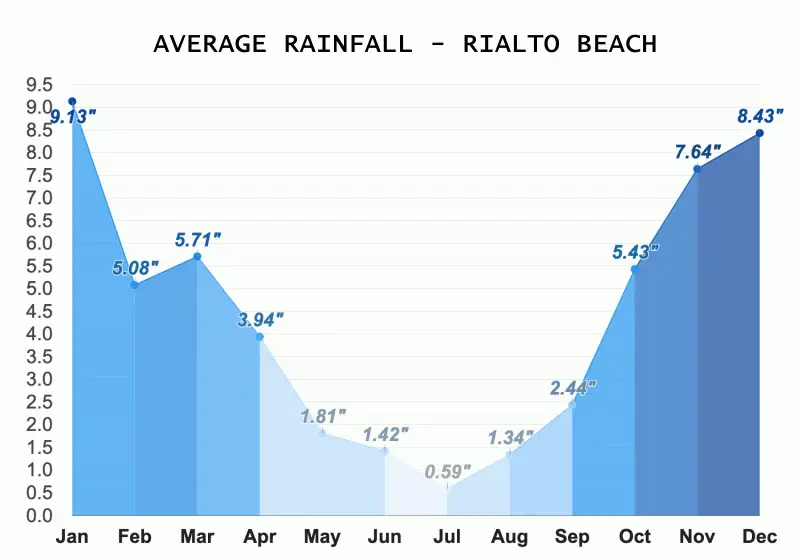
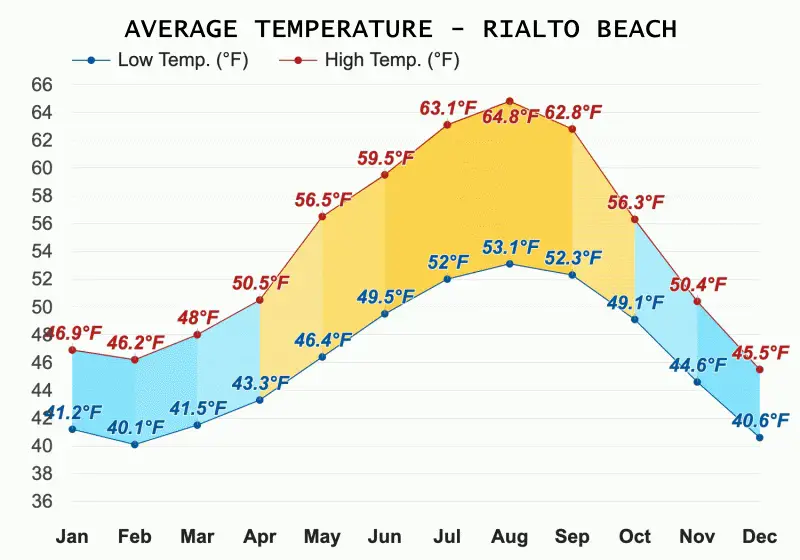
The best time to hike Olympic National Park is in the summer and very early fall. Although snow at the lower elevations is not super common in winter, a large part of the national park is temperate rainforest and most of the rain falls in the winter months.
2. Wear the right gear in winter
At higher elevations like Hurricane Ridge, the best hiking trails in Olympic National Park are usually covered in snow from October to June. Microspikes or snowshoes are essential at this time of year.
3. Be an early bird
July and August are the most crowded months, so try to get as early as possible to the hiking trails. Olympic National Park has several super popular areas like Sol Duc Falls and the Hoh Rainforest and by mid-morning (and sometimes even earlier), you should expect to wait in lines at the park entrances as they manage parking availability.
4. Hike the beach at low tide
Beach hikes should be done at low tides. Always check tidal charts and aim to hike 1.5 hours each side of the low tides. Negative tides are best, especially if you want to explore the tidepools.
5. Check the views are clear
Mountain hikes are best done on a clear day so you can enjoy the views. The weather at the top of Hurricane Ridge is often very different than the weather down in Port Angeles. There is a webcam you can check out before heading up.
6. Be sun sensible
There is little shade on some of the trails, so be sure to have a hat and sunglasses, and wear sunscreen.
7. Get maps
Before setting out, be sure to get maps for all the best hiking trails. Olympic Peninsula trail maps can be downloaded or you can buy a detailed National Geographic topographic trail map here.
8. Take a handheld GPS
Most of these trails are well marked, but for peace of mind, especially for the longer trails, you can invest in a good quality handheld GPS for hiking (see reviews and recommendations here). Or get my top pick Garmin GPS right here.
Travel Insurance for Olympic National Park
You should definitely have travel insurance when you travel to Olympic National Park. Good travel insurance will cover you for trip cancellation, theft or damage if your property when traveling, medical help if you have an accident while hiking the best trails in Olympic National Park or medical repatriation if you need to get medi-vaced out.
A great insurance option is Travelex. It has coverage for all you’ll need. You can compare Travel Insurance plans here or get a quote right now:
Happy hiking!
Do you have any other top picks for the best trails: Olympic National Park? I’d love to hear about it. Join my private Facebook group National Parks Collectors and comment and let me know (you can also pick up extra planning tips, share your photos and stories with other national park lovers and more).
Subscribe to regular updates with tips for planning, travel inspiration and trip ideas and get instant access to the free PDF of this guide to
The Best Hikes in Olympic National Park
If you liked this post about the best day hikes: Olympic National Park, please share the love and Pin It to your Olympic National Park and/ or Hiking boards!
Are you just starting to think about taking a national parks trip? Get Inspiration
Are you starting to plan a trip to Olympic National Park? Read my Guide to Olympic National Park
Are you looking for a place to stay? Seach accommodation guides
Are you ready to book your trip? Use these Planning and Booking Resources
Do you want to read a book about national parks? Check out my Recommended Reading List
About the Author

James Ian is a national park, camping and hiking expert.
He has dedicated his life to travel, visiting more than 80 countries, all 7 continents and most of the national parks in the United States. With over 35 years experience in the travel industry, James has worked on cruise ships, at resorts and hotels, and as a travel planner who’s helped hundreds of people plan successful trips to US national parks.
Based on his experience visiting our national parks multiple times, in-depth research and expertise as a travel planner, James has published detailed itineraries for most of the major national parks in the US. These itineraries, as well as in-depth park guides, comprehensive camping and hiking gear reviews and buying guides, and helpful packing lists and gift guides will help you have your own incredible trip to US national parks without stress and hassle.
As a national park expert, James has contributed to many publications, including USA Today, Time Business News, Savoteur, Best Trip, and Wired.
Parks Collecting is a participant in the Amazon.com Services LLC Associates Program, an affiliate advertising program designed to provide a means for sites to earn advertising fees by advertising and linking to amazon.com. Amazon and the Amazon logo are trademarks of Amazon.com, Inc. or its affiliates. As an Amazon Associate I earn from qualifying purchases.