Arches National Park was not one of the first national parks in the United States that I visited. However, now that I’ve been there, it is definitely one of my favorites. The scenery is spectacular and the hiking at Arches National Park is some of the most fun hiking I’ve done.
There are several distinct areas in the park that you can visit, which limits how much of the park you access. Although I’ve described the hikes below as the ten best Arches National Park hikes, these are actually pretty much the only Arches hikes.
Let’s take a look …
Planning a trip to Arches National Park is getting harder all the time. You can make your planning easy and stress free with a detailed itinerary. I have 1-, and 2-3- day itineraries for Arches National Park that include all the park highlights, give you choices based on your preferred activity level, and take all the stress out of planning your trip.
No time to read about best hikes in Arches National Park, Utah now? Pin It and save it for later:

🛏️ TOP HOTEL PICK: Check availability now
🚘 FIND THE CHEAPEST CAR RENTAL: Search Discover Cars for the best deals
✈️ FIND THE CHEAPEST FLIGHTS: Search Skyscanner for the best deals
🧳 GET TRAVEL INSURANCE: Get insured with Travelex before you go
📱 TAKE AN AUDIO TOUR: Buy an audio tour now
⚠️ An important thing to note before you set out on the Arches hiking trails is that you will see patches of black crust on the ground. This is not actually dirt. It’s “biological soil”.
It’s a living thing that is a very important part of the ecosystem. It’s also very slow growing. If you tread on it, you kill it and it takes about thirty years to grow back! So, you should avoid stepping on it at all costs.
Table of Contents
Arches National Park Trail Map
➡️ For a more detailed Arches National Park hiking map, get the National Geographic Topographic Trails Map.
10 Best Hikes In Arches National Park
Subscribe to daily national parks planning tips, travel inspiration and trip ideas and get instant access to the free PDF of this
Guide to the Best Hikes in Arches National Park
Here are the 10 best trails in Arches National Park:
1. Park Avenue, Arches National Park
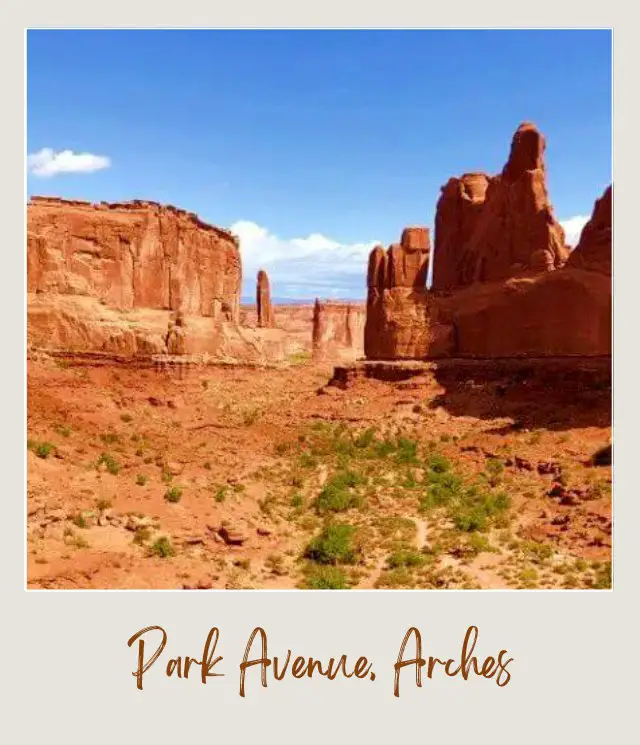
Distance: 1 mile (1.6 km each way = 2 miles/ 3.2 km round trip. Note: Either be picked up at the other end or return along the trail (not the road)
Elevation change: 320 feet/ 98 meters
Starting Point: Either Park Avenue or Courthouse Towers
Difficulty: Moderate
Highlights: Park Avenue, Courthouse Towers, Baby Arch
Best time of day: Morning is good for photography
The Park Avenue trail is the first of the Arches National Park trails that you encounter after you enter the park. It is a short, fairly simple trail that can be accessed from either end. There are small parking lots at both ends. At the Park Avenue end, there is a lookout a very short walk from the parking lot with a great view of Park Avenue.
Park Avenue is a shallow valley between two cliffs of sandstone and is presumably named because it is kind of like the famous New York City avenue surrounded by a row of tall buildings on both sides.
The hike goes down into the valley, so the cliffs are all around you. The descent into the valley is short but pretty steep, on a well-marked trail. After this steep section, the rest of the hike is fairly flat and for the most part follows a stony wash. Near the end, there are some enormous rectangular pillars (called the Courthouse). If you look up to the left, you can see the only arch on this hike – Baby Arch. It’s high up and, as the name implies, is small.
At the end, you can either be picked up if you are with someone who didn’t do the hike, or return the way you came.
2. Balanced Rock, Arches National Park

Distance: 0.3 miles / 480 m
Elevation change: 25 feet / 7.5 m
Starting Point: Balanced Rock parking area
Difficulty: Easy
Highlights: Balanced Rock
Balanced Rock is just before the turnoff to the Windows section and just after Petrified Dunes. Arches National Park is mostly about the arches and fins, so this is something a bit different.
Balanced Rock is what it sounds like – a large boulder that looks like it is balancing on another pillar of rock. If actually isn’t a separate boulder, but it is eroding in a way that looks like it, and eventually, I guess, it will and then it will topple. For now, it’s safe, though.
The Balanced Rock trail is a very easy hike on a paved, mostly flat trail that goes around Balanced Rock. You can see the rock from the road and small parking lot, but the trail takes you up close and personal.
The trail splits after a couple of hundred feet and creates a loop around the rock. Either direction is fine. There is a small picnic area nearby.
➡️ Read more: 12 Fun Facts About Arches National Park
3. Double Arch, Arches National Park
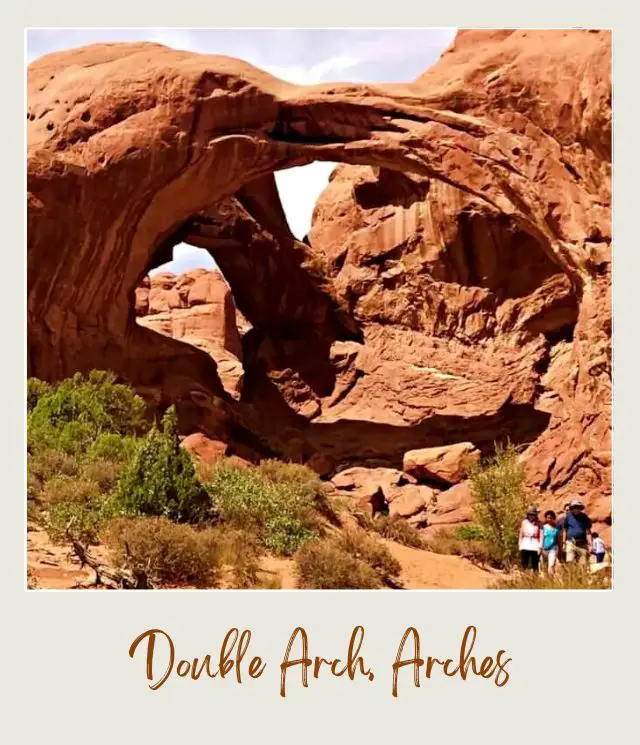
Distance: 0.25 miles/ 0.4 km one way = 0.5 miles/ 0.8 km round trip
Elevation change: Negligible
Starting Point: Double Arch parking area
Difficulty: Easy
Highlights: Double Arch
Best time of day: Morning is best for photography
The Double Arch trail is one of the easy hikes in Arches National Park and one of the most popular.
It is in the Windows area of the park. Drive to the end of Windows Road to get there.
Parking
At the end of the road, there is a loop. The top section that you hit first is nearest to the Windows (see below) and the bottom half of the loop is closest to Double Arch. There are parking areas in both sections.
However, this area gets extremely busy and the parking areas are quite small. And the distance between them is short and there is a path connecting them, SO – when you see a free parking spot, grab it! You can visit both Double Arch and the Windows without moving your vehicle.
The hike
The hike is along a smooth dirt path and is fairly flat and easy. However, it does get very hot in summer, so wear a hat! The arch is very cool; there are two arches together.
You can climb up closer to them, but that does involve some scrambling up rocks.
The last part of the scramble to get to the bottom of the arch is very steep. However, you can see them both of the arches well from the end of the flat trail if climbing up rocks isn’t your thing.
4. The Windows, Arches National Park

Distance: 1.1 miles/ 1.8 km round trip
Elevation change: Minor
Starting Point: Windows parking lot
Difficulty: Easy (moderate for primitive trail)
Highlights: North Window, South Window, Turret Arch
The Windows Section Arches National Park
From the parking lot (see above), a fairly easy trail leads to North and South Windows with a short spur to Turret Arch.
North and South Windows, Arches National Park
North and South Windows are two large arches next to each other. This is one of the best hikes Arches National Park for non-hikers, as, despite the fact that there are some steps, the trail is still fairly easy.
The first 100 yards or so is paved and flat, then there are some steps and a rougher surface. The path diverges after a while and to the trail is Turret Arch goes to the right while the Windows are to the left.
It doesn’t matter where you go first, as there is another short trail connecting the Windows to Turret Arch and you can do a loop to see them all.
The first arch you come to is North Window, and this is the most popular. It is a reasonably easy scramble up from the trail to the arch itself. You can stand inside the arch and look out over the park.
From the North Window, continue along the trail to the South Window. You can go back the way you came (or hop over to Turret Arch), or you can return from South Window to the parking area via a primitive trail that goes behind the two windows. There are cairns marking the primitive trail.
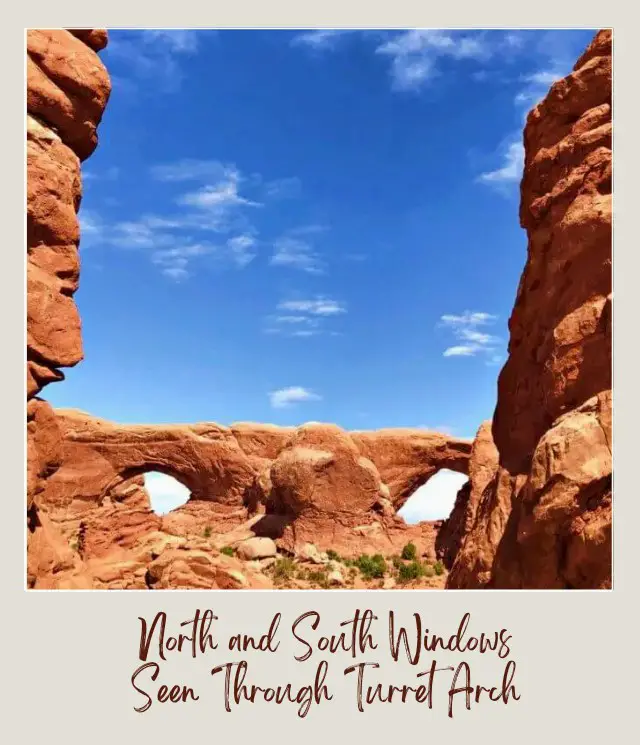
Turret Arch, Arches National Park
This is named after the turret-like pillar next to the arch. It is less visited than the Windows, even though it is only a couple of hundred yards away.
There is a bit of an incline with some steps. When you go through the arch, turn around and look back to see the Windows framed through the arch.
5. Delicate Arch, Arches National Park

Distance: 1.5 miles/ 2.4 km one way (3 miles/ 4.8 km round trip)
Elevation change: 400 feet (all uphill going and all downhill returning)
Starting Point: Wolfe Ranch parking lot
Difficulty: Moderate
Highlights: Wolfe Ranch, Delicate Arch
Best time: Sunset
Delicate Arch is without a doubt the most famous arch in the park. In fact, it adorns Utah’s license plates. It is so famous because, unlike most of the arches, it is free standing.
This is definitely one of the best hikes at Arches National Park, but is not the easiest. To see the arch glow golden like it does in most photos, you will need to see it at sunset. This also means you will escape the heat of the middle of the day.
However, if you do this, head back almost as soon as the sun sets because there is a long way back and take a flashlight in case it is dark before you get back to your vehicle.
Right at the beginning of the trail is Wolfe Ranch, a historic cabin that gives you a real sense of how hard life was for the pioneers. It is worth the short diversion to see it up close. The trail soon crosses a bridge over Salt Wash, then continues up a long stretch of open sliprock. This is very exposed and hot in the summer – make sure you have enough water. ➡️ If you need a water bottle, you can get one right here before you go.
At the top, it winds through an area of chert (a hard, shiny rock used by Native Americans for tools and weapons). There are signs, but at some places, the trail is not easy to see. Chances are, though, that you won’t be alone, so it’s hard to get lost for long.
At the end, the trail goes along a short ledge, hugging a cliff with a steep drop off on the left. Keep an eye out for a tiny arch, Twisted Donut Arch, on your right.
Then, you round a corner and BAM! One of the most breathtaking views you will ever see in your life. Photos do not do Delicate Arch justice. It is set on the edge of a bowl, with a sheer drop off on the far side and is nothing short of stunning.
You can take a seat pretty much straight after you see it (this is probably the best angle for sunset photos), or continue along and walk right up to the arch. Keep in mind, you will be walking into photos, and some people are very serious about their photos, so I would avoid doing this close to sunset unless you like being shouted at.
6. Delicate Arch Viewpoint Trail, Arches National Park

Lower Trail
Distance: 100 yards
Elevation change: Negligible
Starting Point: Viewpoint Parking Lot
Difficulty: Easy (Lower Trail is easier)
Trail Highlights: Delicate Arch (distant view)
This is a very easy 5-minute walk from the parking lot to a spot where you can look through Delicate Arch. Note that the arch is 0.75 miles/ 1.2 km away.
Upper Trail
Distance: 0.5 miles/ 0.8 km
Elevation change: 200 feet (60 m)
Starting Point: Viewpoint Parking Lot
Difficulty: Easy (Lower Trail is easier)
Trail Highlights: Delicate Arch (distant view)
This trail goes up some steps and winds up a sliprock ridge to get a closer view of Delicate Arch. I went early on the morning and you can see the shadows recede across the arch until most of the arch is lit with early morning sunlight.
Although it is a little closer than the Lower Trail, it is still a distant view, and I would recommend binoculars and a zoom lens.
➡️ If you are looking for a pair of binoculars, the best binoculars for the money are the Vortex Diamondback HD 10 x 42 Roof Prism binoculars (You can also read more options in my review of the Best Binoculars for the Money).
➡️ If you are using a cell phone as your camera, you can buy a Zoom lens for your phone.
7. Devil’s Garden, Arches National Park

Distance:
⭕ To Landscape Arch: 0.8 miles/ 1.3 km one way
⭕ To Double O Arch: 2 miles/ 3.2 km one way
⭕ Full Trail: 7.2 miles/ 11.5 km (loop including primitive trail)
Elevation change: Considerable up and down
Starting Point: Devil’s Garden parking area
Difficulty:
⭕ To Landscape Arch: Easy
⭕ To Double O Arch: Moderate-Difficult
⭕ Primitive Loop Trail between Double O Arch and Landscape Arch: Difficult
Highlights: Pine Tree Arch, Tunnel Arch, Landscape Arch, Partition Arch, Navajo Arch, Double O Arch, Private Arch, Fin Canyon
Best time: Mornings are cooler and better for photography
Devil’s Garden trail, the longest trail in the park, has some of the best hiking in Arches National Park. It passes eight arches in total and goes through the fantastic Fin Canyon. The entire trail is long, hot and hard, but it is also possible to do just part of it, as there are three distinct sections.
Landscape Arch, Arches National Park
The first section, the Landscape Arch hike, is an easy paved trail with little elevation change. There is a short spur trail off to the right a short way into the hike that takes you to Pine Tree Arch (named after the pine tree in the middle of the arch) and Tunnel Arch, which looks like a tunnel and you only see at a distance.

This section ends at Landscape Arch, which, at 306 feet/ 93.3 m, is the longest single span arch in North America. It is also incredibly thin (just 11 feet / 3.4 m) thick at its center.
Double O Arch, Arches National Park
The second section in Devil’s Garden, the Double O Arch trail, is moderate to strenuous. It goes over exposed narrow ridges along the tops of fins with drop offs on both sides, so is not great if you have a fear of heights. This section is definitely more difficult and includes some steep crevices where steps have been cut into the rocks. The trail is not recommended if there is lightening, snow or ice.
A side spur trail goes off to the left and up to Navajo Arch and Partition Arch (which is the arch you can see way up high from the viewpoint for Landscape Arch). It is worth taking this side trip, as they are both great.
Back on the main trail, there is a (very distant and kind of underwhelming) view of Black Cave Arch before ending at the truly stunning Double O Arch. Climb up through the smaller ‘O’ and up a small rise on the other side for the best view of the double ‘O’.

From there, you can either go back the way you came or take the primitive trail back, making a loop.
Dark Angel, Arches National Park
Before you do either, you can see a pillar off in the distance and a small sign indicating a path to Dark Angel. That pillar is Dark Angel. It’s not super exciting and if you are feeling tired or hot, you could skip it, but if you have some energy, you can take the out-and-back spur trail out to see the rock pillar up close.
Primitive Trail
If you are feeling up for an adventure, then take the primitive trail back. It goes via Fin Canyon and along the way a short side trail takes you to Private Arch. The primitive trail involves wading through a pool of water (that is sometimes dried up), frequent scrambling and rocky surface hiking on a less developed trail, which is difficult to follow in places. The trail is marked by cairns and logs and you do need to pay attention to avoid getting lost. It adds an extra mile (1.6 km) to the return trip from Double O Arch. It is not recommended when rock is wet or snowy. It is great fun though!
➡️ For a full trail description and more information, read my detailed Guide to Devil’s Garden Trail.
8. Sand Dune Arch, Broken Arch and Tapestry Arch, Arches National Park
Distance:
⭕ From Campground to Broken Arch: 0.6 miles/ 1 km each way
⭕ From Campground to Sand Dune Arch: 1.25 miles/ 2 km one way
⭕ Sand Dune Arch only from the Sand Dune Arch Trailhead parking lot: 0.2 miles / 0.3 km one way
⭕ From Sand Dune Arch parking lot to Broken Arch: 0.6 miles/ 1 km one way
Elevation change: Negligible (but a lot of the trail is soft sand)
Starting Point:
⭕ Campground: Start at the toilet block near campsite #40 and end between campsites # 51 and #52 (or vice versa)
⭕ Sand Dune Arch only: Sand Dune Arch Trailhead parking area
Difficulty: Easy
Highlights: Tapestry Arch, Broken Arch, Sand Dune Arch
There are a few different options for this hike.
Sand Dune Arch, Arches National Park
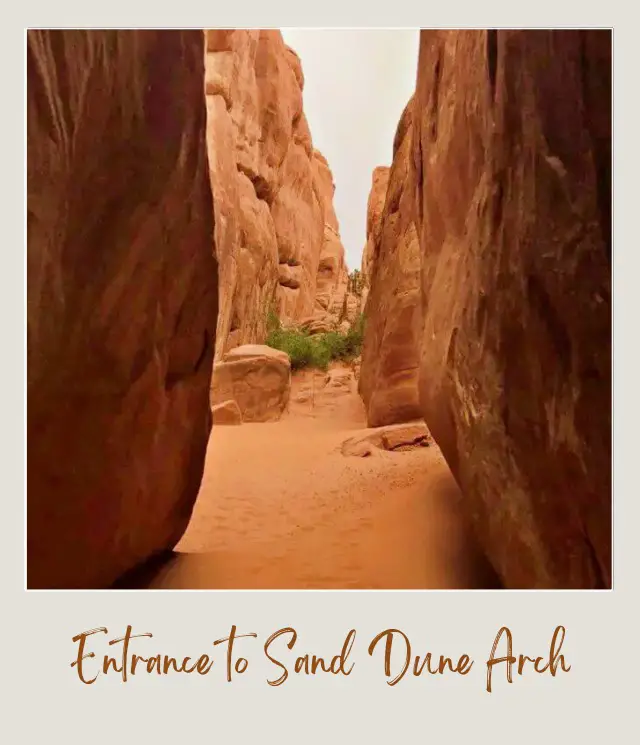
Sand Dune Arch is very cool (literally and metaphorically) and easily one of the best short hikes in Arches National Park. The arch is well-concealed (but the path is obvious). You enter through a narrow crevice between two fins, which opens up into a small enclosed area surrounded by rock walls and covered in soft sand. You wonder where the arch is. Then, after you go a short distance, wow, there it is off to the right with a small sand dune at its base.
This is a shady area that is good for young kids on hot days. It is fairly small, though, so it can get crowded. Head there late in the afternoon to beat the crowds.
There is a parking lot right here off the main Arches Scenic Road and you can definitely just visit the arch and leave it there. However, there are a couple of options if you also want to see Broken Arch and Tapestry Arch.
Broken Arch, Arches National Park

Broken Arch is not actually broken, but a crack in the top makes it look like it is, and one day it will be, I imagine. There are a couple of different options to get here.
From Sand Dune Arch, a trail leads off to the left that takes you through scrub and on soft sand to Broken Arch. Then return back the way you came or climb through the arch and continue along to get to a side trail that takes you to Tapestry Arch. The main trail continues all the way to the Devil’s Garden Campground.
To do this in reverse, start at the toilet block near campsite #40 or between campsites # 51 and #52 in Devil’s Garden Campground. The trail winds through open blackbrush and sage flats. You can go to Tapestry Arch and Broken Arch then go through Broken Arch and continue on to Sand Dune Arch. It’s a pretty easy stroll through a sandy area.
Or, if you want a bit of a break from hiking Arches National Park, turn back to the campground and then drive to Sand Dune Arch.
Tapestry Arch, Arches National Park
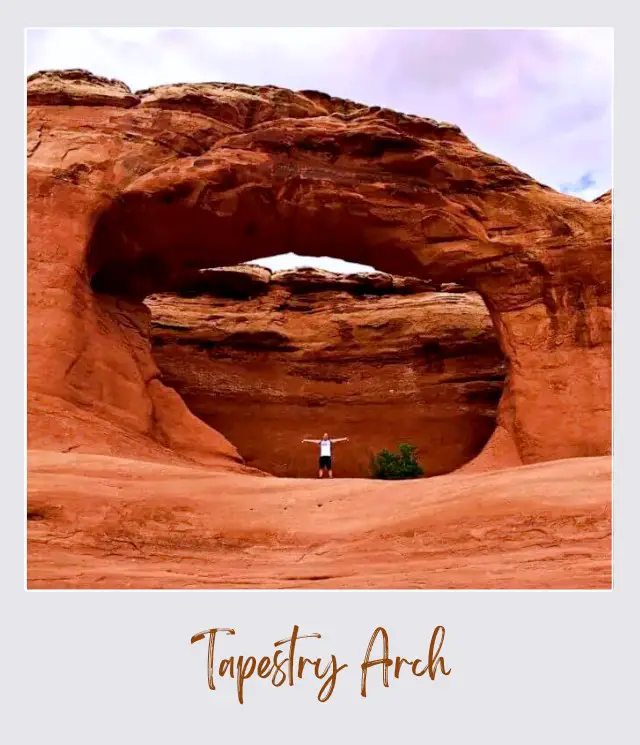
This is a cool and large arch that is not nearly as visited as most of the others because you do need to hike on soft sand to get there. There are three other arches forming next to it, in the same fin. You can clamber up to the base of the arch and stand inside it (climbing on the top of arches is not permitted).
9. Skyline Arch, Arches National Park
Distance: 0.2 miles/ 0.3 km one way
Elevation change: Negligible
Starting Point: Skyline Arch parking lot
Difficulty: Easy
Highlights: Skyline Arch
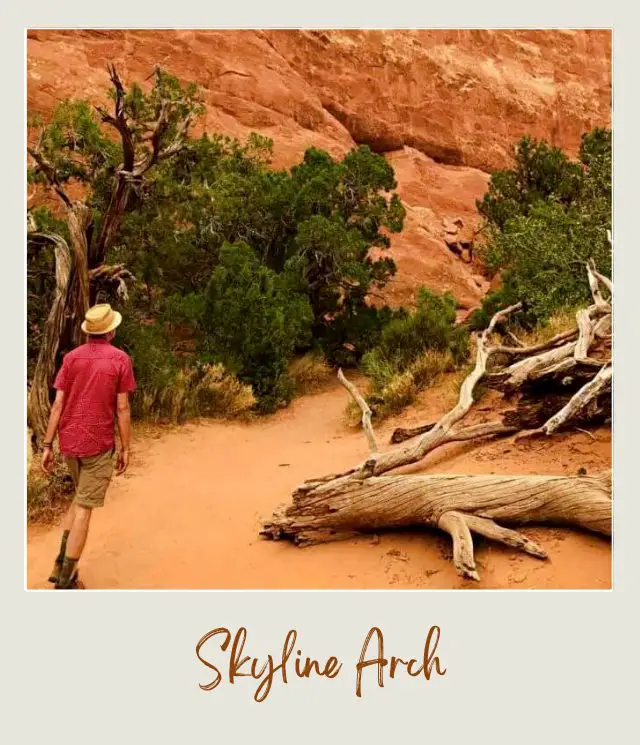
You can see Skyline Arch from the parking lot (and see the back of it from the Devil’s Garden Campground). It is high up at the top of a cliff and you can’t hike to the arch itself, but you can hike to the base of the cliff.
An interesting fact about Skyline Arch – until 1940, the arch was half blocked. Then in 1940, the blocked half tore loose and tumbled down to the bottom. The short trail ends at the rock fall. Seeing the huge boulders is impressive.
The trail is sand, but short and mostly flat. It’s a simple hike that you don’t need to be very fit to do.
10. Fiery Furnace, Arches National Park
Distance: 2.3 miles/ 3.7 km
Elevation change: 45 feet / 13.7 m
Starting Point: Fiery Furnace Parking Area
Difficulty: Difficult
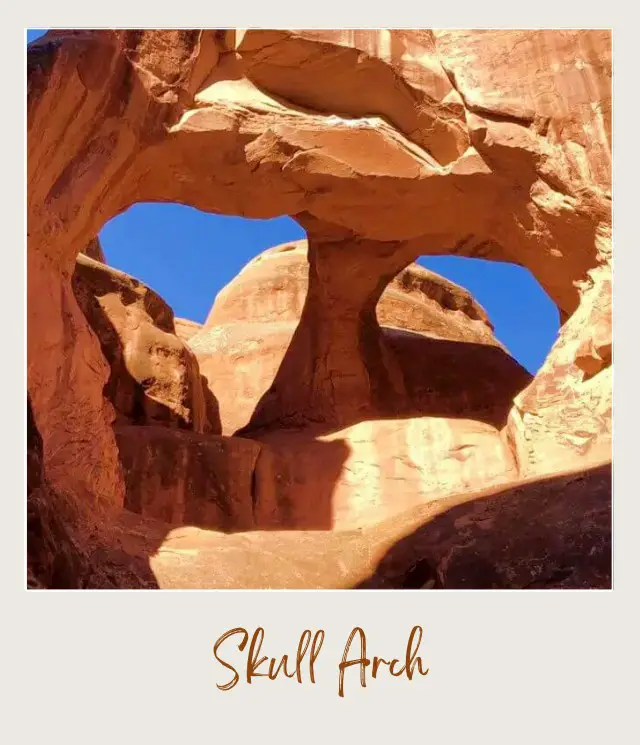
Highlights: Skull Arch, Surprise Arch, Crawl-through Arch
Fiery Furnace is a labyrinth of narrow passageways between tall fins. It is named because of the flame color it takes on when the late afternoon sun hits the rocks, not for heat (it is often surprisingly cool, in fact, since the tall walls prevent direct sunlight).
This is one of the best Arches National Park hiking trails and a highlight of a visit to the park. However, it’s not as simple to access this trail as it is the others. It is not open except for:
ℹ️ There are ranger-led hikes from May to September. You do this in a group of maximum 16 people. You can book a place online here six months in advance or at the Visitor Center up to seven days in advance. I recommend booking online, as it’s very popular and spaces are very limited.
You then need to check in and pick up your ticket at the Visitor Center before you go to the trailhead. You can pick up tickets up to 4 days and at least one hour before your scheduled hike. No children under 5 are permitted. There are usually two morning tours (9:00am and 9:30am) that last about 2 hours and can be reserved online plus afternoon tours that can only be purchased in person at the Visitor Center.
ℹ️ If you want to hike without a ranger, you need to get a permit from the Visitor Center up to seven days in advance (there are no online or phone bookings). You can’t stay overnight and you need to watch a video before you go. GPS usually doesn’t work because of the walls all around you, and it is easy to get lost. There is more information on the National Park Service website.
ℹ️ You can go with a private company that provides a guide and gets permits for you. Obviously, you pay for this.
I did the ranger-led hike. I prefer not to hike in a big group, but it was OK and definitely felt safer than wandering through the maze by myself and getting lost.
The trail involves climbing up and down, walking along a ledge with a drop off, leaping over a deep crevice and squeezing between two rocks using your feet and back. It sounds scarier than it is, but you do need to be up for it.
The ranger shows you the main arches, including a tiny arch that you can crawl through (called Crawl-Through Arch for obvious reasons). You can walk around it much more easily, but you can crawl through it to say you did.
Also, Skull Arch, a very cool arch that looks like a skull, and Surprise Arch. The ranger also gives lots of extra information that you wouldn’t get by going alone, so it is definitely worth it.
Happy hiking!
Before you set out on these hikes, you will want to make sure you have the right gear.
🥾 Day Hike Essentials (Packing List)
🥾 Hiking Gear for Beginners (Packing List)
🥾 Best Hiking Shoes / Boots (Reviews & Recommendations)
🥾 Best Hiking Sandals (Reviews & Recommendations)
🥾 Best Winter Hiking Boots for Men (Reviews & Recommendations)
🥾 Best Winter Hiking Boots for Women (Reviews & Recommendations)
🥾 Best Baby Hiking Backpack Carrier (Reviews & Recommendations)
🥾 Best Backpack Carrier to Take Your Dog Hiking (Reviews & Recommendations)
Additional Planning Resources for Arches National Park
⭐ Planning a Trip to Arches National Park: 7 Mistakes to Avoid
⭐ How Many Days in Arches National Park Do You Need?
⭐ Guide To The Arches National Park Reservations System
⭐ 10 Tips For Visiting Arches National Park
⭐ In-Depth Guide To The Devil’s Garden Hike
⭐ Arches Scenic Drive: Complete Guide to All the Stops
⭐ How To Get To Arches National Park
⭐ What Is The Closest Airport To Arches National Park?
⭐ All the Airports near Arches National Park
⭐ When is the Best Time to Visit Arches National Park?
⭐ Visiting Arches National Park: What To Expect Throughout the Year
⭐ 12 Fun Facts About Arches National Park
⭐ Arches Itinerary
⭐ The Best Airbnb Moab
⭐ The Best Books About Arches National Park
Have you done any of these Arches NP hikes? Which one did you think was the best hike in Arches National Park (or which one are you most excited to do?) Join my private Facebook group National Parks Collectors and comment and let me know.
Planning a trip to Arches National Park is getting harder all the time. You can make your planning easy and stress free with a detailed itinerary. I have 1-, and 2-3- day itineraries for Arches National Park that include all the park highlights, give you choices based on your preferred activity level, and take all the stress out of planning your trip.
Subscribe to daily national parks planning tips, travel inspiration and trip ideas and get instant access to the free PDF of this
Guide to the Best Hikes in Arches National Park
If you liked this article, Pin it to your National Parks and Arches National Parks boards!

💡 Are you just starting to think about taking a national parks trip? Get Inspiration
‼️ Are you looking for helpful tips for visiting US national parks? Read articles that share useful tips on a range of national-park related issues
💻 Are you starting to plan a trip to Arches National Park? Read my Guide to Arches National Park
📋 Do you want a ready-made super detailed plan for your trip to Arches? Get a detailed 1 – 3-day Arches National Park Itinerary
🛏️ Are you looking for a place to stay near Arches National Park? Find a vacation rental near Arches National Park
💲 Are you ready to book your trip? Use these Planning and Booking Resources
📖 Do you want to read a book about Arches National Park? Check out my Recommended Reading List for Arches National Park
About the Author

James Ian is a national park, camping and hiking expert.
He has dedicated his life to travel, visiting more than 80 countries, all 7 continents and most of the national parks in the United States. With over 35 years experience in the travel industry, James has worked on cruise ships, at resorts and hotels, and as a travel planner who’s helped hundreds of people plan successful trips to US national parks.
Based on his experience visiting our national parks multiple times, in-depth research and expertise as a travel planner, James has published detailed itineraries for many of the major national parks in the US. These itineraries, as well as in-depth park guides, and other resources will help you have your own incredible trip to US national parks without stress and hassle.
As a national park expert, James has contributed to many publications, including USA Today, Newsweek, Time Business News, Savoteur, Best Trip, and Wired.
I’m a member of the Amazon Services LLC Associates Program. As an Amazon Associate I earn from qualifying purchases.
